It's spring here in Oregon. And I am loving it! Seeds coming up, gardening fever, things blooming..... And those of us who grow our own food, can and preserve foods are anxious for the season to start. I know I can't wait. And every day that I see new seedlings poking up I get more excited.
Not all of you know that I'm part of a pretty tight knit group of friends, we love to harvest, put up that harvest and try all these wonderful new foods. Yeah, I am a canning addict and last year was just the beginning! This year I hope to put away almost twice as much as I did last year and I have a couple favorites to share here.
Salsas, what can I say, everyone loves a great salsa. They are a great ice breaker at a party, or potluck, an easy appetizer dish to bring, but did you know that they are good with so many other foods, not just for dipping with chips, but they're great on meats, fish, and even toppings for nachos?
Most people when they hear salsa, they think of a traditional tomato based salsa that is pretty much pureed, like they get out of a jar of Pace or at a restaurant. But they're so much more than that.
Enter the good fresh made chunky salsas....
And yes, you can can them to enjoy all year around! Or you can make them fresh, or even fermented. YUM!
Though I usually make my green chili salsa to take to potlucks as it is very popular and never lasts long. And the longer it sits the warmer or hotter it can get. So be careful of the heat level of your peppers.
Roasted Green chilies are the best and while they're roasting, the aroma is incredible. These were anaheims and poblanos and a few serranos I got this last summer, ready to go on the grill to roast. You can also roast them on a dry skillet on the stove or under your broiler. You want to char the skins, blister them, then let them rest for a bit under a damp kitchen towel for a bit. It makes peeling off the skin easier. And please be sure to use gloves when handling hot peppers! The capsicum can irritate your skin if you have sensitive skin.
When making salsas, the freshest you can get the ingredients, the better your salsa.
Then when you think you've had enough of prepping all your ingredients, And you swear you will never chop another tomato, you will rethink your current thoughts. Because you will be so thrilled with the outcome and you may have found that you have a new food love. So much better than anything you can get at the store. I promise!
Ok, so with all that said, I'll share my green chili salsa and fresh peach salsa with you....
Green Chili Salsa
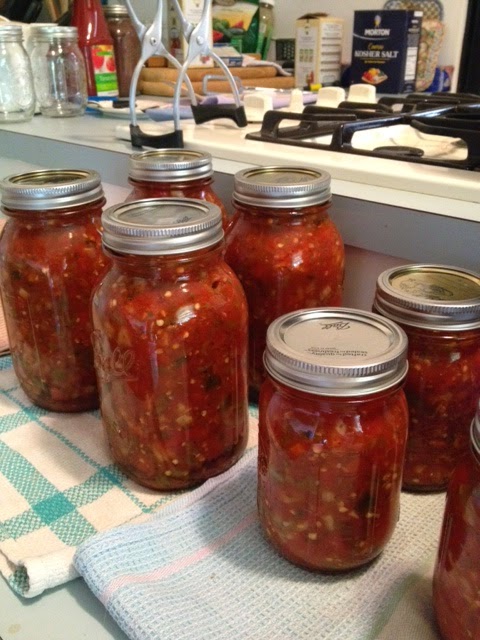
About 20 lbs ripe tomatoes, Chopped fairly fine
3 large onions, chopped fine
6 cloves of garlic, minced
1/4 cup each chopped parsley and cilantro (if you don't have fresh, a Tbl of each dry is fine)
2 Tbl sea salt
1 Tbl black pepper
3/4 cup red wine vinegar
1/4 cup lime juice
1 Tbl oregano
10-15 roasted green chilies, anaheims or poblanos are fine, stemmed, and chopped. If you want milder, remove the seeds
5 Serrano peppers, minced. (These don't have to be roasted)
1/4 cup plain red chili powder
1 Tbl ground cumin
Mix all ingredients together. Taste and adjust salt if needed. Have your water bath canner going and ready. Sterilize your jars in boiling water for 10 minutes, and your lids.
Fill your jars with the fresh salsa leaving 1 inch headspace. Wipe rims and seal with hot lids. Process jars in the boiling water bath for 15 minutes for pints, 20 minutes for quarts.
Allow jars to cool on towels on the counter. Check your seals when cool and reprocess any that did not seal or put them in the fridge and enjoy. Try to let them rest for at least a week for all the amazing flavors to meld together.
Now onto the Peach Salsa! I promise it is amazing, and will quickly become a favorite.
Of course sun ripened fresh picked peaches are a must!
Ready??? Ok, here goes...
Sunny Peach Salsa
6 cups of firm but ripe peaches, diced
1 cup of sugar (I only did a half cup)
1 cup chopped roasted green chilies
2 minced serranos or jalapeno peppers (fresh)
1 cup apple cider vinegar
1 cup chopped red onion
1/4 cup lime juice
1/2 tsp sea salt
4 garlic cloves, minced
1/4 cup chopped fresh cilantro
1/8 cup red chili powder
1 Tbl dried oregano
1 tsp cumin
Mix all together and let sit for a few while you sterilize and prepare your jars and lids.
Fill your hot sterile jars leaving 1/2 inch headspace, wipe rims and seal with hot lids.
Process pints 10 minutes and quarts 15 minutes in a boiling water bath. When time is up, turn off the heat and let the jars sit in the bath an additional 5 minutes. Remove jars and allow them to cool 24 hours on a towel on the counter. Test and check to ensure the jars sealed. Reprocess any that did not or put into the refrigerator.
Let them sit at least a week to let the flavors develop. I did double the recipe and got around 6 pints of salsa.
Both of these salsas can store at least a year in a cool dark storage place. Refrigerate any jar after opening.
Enjoy them! If you make them this summer, let me know how you liked them. I am looking forward to also making mango salsa and a strawberry salsa. Well there might be a rhubarb salsa in there too!
What is your favorite way to enjoy salsa? I'd love to hear!
Recipes, tips, and info for cooking, canning, and preserving foods without gluten.
Tuesday, March 24, 2015
Thursday, March 5, 2015
Time For a Review and a Giveaway!
First, I apologize for being late in getting around to doing this! No excuses, I've been distracted lately.
OK.... Last post I wrote about Love With Food, a company with great healthy snacks and gluten-free goodies in their snack boxes, who also do great things to help end childhood hunger and food insecurity here in the states.
Ok, While I could prattle on and on about the tastes of everything, I will get down to the Giveaway...... Love with Food will give two readers a box to try. And if you use their link HERE, you can get 50% off of your first order! Prices are very reasonable for the quality and quantity you'll be getting.
Ok, easy entry, just use the rafflecopter for entries! Contest ends Tuesday, March 10th! Good Luck! And please help support a good company!
a Rafflecopter giveaway
OK.... Last post I wrote about Love With Food, a company with great healthy snacks and gluten-free goodies in their snack boxes, who also do great things to help end childhood hunger and food insecurity here in the states.
When my sample box arrived I was amazed at all the goodies in the box! And that it had a theme, this one was for Mardi Gras. Oh my! And there is a lot of stuff in this box! Not just good snacks to enjoy, but also a Pancake and Waffle mix by Cup 4 Cup, chocolates (my favorite treat), Key Lime White Chocolate cookies by Wow Baking Company (and I can attest that they are heavenly nibblers), and other great well made foods. Their tagline is "Share your Love With Food", Artisan Snacks Without Artificial Junk.
I am very impressed at the quality of the items in the box, that everything tastes good and that they also included several coupons in the box for several of these tasty treats.
Yeah, I am loving them. And I especially love what they're about, which is donating over 400,000 meals to kids that need better food security.
Ok, easy entry, just use the rafflecopter for entries! Contest ends Tuesday, March 10th! Good Luck! And please help support a good company!
a Rafflecopter giveaway
Tuesday, February 17, 2015
New things coming along with reviews
Well folks, it's a gorgeous spring day in Oregon in February of all things!
Just a quick post here about a new email subscription service for folks with food allergies and intolerances, especially for those who need to be Gluten Free. Yummy snack boxes that help feed kids in need! And, pretty soon we will be doing a few reviews for Love With Food Snack Boxes. They have also generously offered to sponsor some giveaways that we will post when we review the goodies. This gives you all a chance to try out new goodies too!
To be honest, this is a relatively new thing to me, and after some email correspondence from them and reading up on it a bit more, I truly think they have a wonderful thing to help feed hungry kids in the US by donating to help feed kids one meal at a time with each box ordered. This is what they have to say about their program:
For every box sold, we donate a meal to several food banks such as the Feeding America Network and Share Our Strength - No Kid Hungry. Join us to help end child hunger one meal at a time!
Say goodbye to boring grocery selections and start discovering your Love With Food experience!
These are organic and natural snacks and goodies that are Gluten-Free. Which is a good thing for kiddos that may be gluten-free in your family. Or even for yourself if you're out hiking, picking fresh things, or need a quick wholesome snack on the run. Although of course we would encourage you to actually take the time to not eat on the run literally, but take time to slow down and enjoy what you're nourishing your body with. ;)
And, for those of you who do read this blog, they will offer 50% off of your first box order. Just follow this LINK. This will take you to their page to start subscribing or ordering your first snack box.
You can also follow them on Facebook at G-Free Foodie
And on YouTube at G-Free Foodie
I will say I do love that some of the major chefs I really admire are helping support this effort to end hunger. And I'm sure you've seen the ads on the Food Network for No Kid Hungry. And for me personally, I am extremely happy to see that some attention is at long last being given to the kids in need in our own towns, cities and country.
So yeah, I'm pretty jazzed to share this with you and help the kids who need help too!
See you all soon! Lisa
Just a quick post here about a new email subscription service for folks with food allergies and intolerances, especially for those who need to be Gluten Free. Yummy snack boxes that help feed kids in need! And, pretty soon we will be doing a few reviews for Love With Food Snack Boxes. They have also generously offered to sponsor some giveaways that we will post when we review the goodies. This gives you all a chance to try out new goodies too!
To be honest, this is a relatively new thing to me, and after some email correspondence from them and reading up on it a bit more, I truly think they have a wonderful thing to help feed hungry kids in the US by donating to help feed kids one meal at a time with each box ordered. This is what they have to say about their program:
What is Love With Food?
Love With Food helps you discover new organic or all-natural snacks delivered to your door every month. Our subscription membership starts as low as $10/month. Every month, Love With Food members will receive a curated box of unique, hard-to-find tasty snacks which varies based on seasonal themes.For every box sold, we donate a meal to several food banks such as the Feeding America Network and Share Our Strength - No Kid Hungry. Join us to help end child hunger one meal at a time!
Say goodbye to boring grocery selections and start discovering your Love With Food experience!
These are organic and natural snacks and goodies that are Gluten-Free. Which is a good thing for kiddos that may be gluten-free in your family. Or even for yourself if you're out hiking, picking fresh things, or need a quick wholesome snack on the run. Although of course we would encourage you to actually take the time to not eat on the run literally, but take time to slow down and enjoy what you're nourishing your body with. ;)
And, for those of you who do read this blog, they will offer 50% off of your first box order. Just follow this LINK. This will take you to their page to start subscribing or ordering your first snack box.
You can also follow them on Facebook at G-Free Foodie
And on YouTube at G-Free Foodie
I will say I do love that some of the major chefs I really admire are helping support this effort to end hunger. And I'm sure you've seen the ads on the Food Network for No Kid Hungry. And for me personally, I am extremely happy to see that some attention is at long last being given to the kids in need in our own towns, cities and country.
So yeah, I'm pretty jazzed to share this with you and help the kids who need help too!
See you all soon! Lisa
Saturday, February 7, 2015
Yummy things even in Winter!
Last weekend I went shopping at some of the Asian markets in Portland. I've had a hankering for mangoes, one of my favorite fruits from childhood. I absolutely love them. Such a versatile fruit.
I grew up mostly with the Haden types, and they grew large in Florida. And so juicy! I've tried the Ataulfo or champagne and found them not as sweet or large.
So when I found them reasonably priced I had to have a flat!
As the week progressed and I awaited them to ripen, I decided to try making my version of cowboy candy using my own bread and butter pickling brine that I use to pickle summer squash in.
Anyone who doesn't know what cowboy candy is, it's basically bread and butter pickled jalapenos. And yes, it's addicting on sandwiches, crackers, snacking.
So, today I set out to make my yummy things.
And today I'll share my cowboy candy recipe with you.
Cowboy Candy
4 lbs of a mix of green jalapenos, and if desired red fresno peppers, washed, stem ends cut off and sliced in 1/4 inch rings
For the brine:
In a large stock pot add
2/3 cup kosher salt
5 cups sugar
2 Tbl mustard seeds
2 Tbl turmeric
2 tsp celery seeds
2 tsp fennel seeds
4 cloves
3 cups apple cider vinegar
2 cups white vinegar
Bring the brine to a rapid simmer over medium heat stirring occasionally.
Ready your jars and lids and have your boiling water bath canner ready.
Pack the raw jalapeno slices into the hot sterile jars leaving 1/2 inch headspace. Ladle the hot brine over the jalapenos just covering them. Wipe your jar rims and threads with a damp paper towel. Seal the jars with hot lids. Process in your boiling water bath for 10 minutes, (adjusting time for altitude). Carefully lift the jars out and let them cool on a folded towel for 24 hours. Yes the peppers will float as they were raw packed, but they will meld with the brine and get plump over the course of a week. Let the flavors meld and serve chilled. YUM!!!
This will make 9 pints of candy!
Mango Thai Pepper Jelly
4 Cups of finely chopped mangoes, about 4 large mangoes
1 cup dried thai chili rings
2 Tbl lime juice
5 3/4 cups sugar
2 finely minced garlic cloves
1/4 cup apple cider vinegar
2 pouches of certo liquid pectin
Puree the mango, chili rings, and garlic and add to a large stock pot. Add the vinegar, lime juice, and sugar and bring to a full rolling boil and then boil for 2 minutes stirring constantly. Add the pectin and cook 1 minute more then remove from heat and skim any foam off.
Ladle into hot sterile jars, wipe the rims with a damp paper towel and seal with hot lids. Process in a boiling water bath for 10 minutes, adjusting time for altitude. Remove the jars and let them cool on a towel for 24 hours.
Makes 8, 1/2 pints.
Please note that for those of us who are celiac, after checking the ingredients of Certo's liquid pectin, it appears that it may be safe for us to use. Although as this summer season comes into swing, I'll be figuring out how to make my own liquid pectin from fruits. :)
Enjoy! Please let us know if you try them and if you liked them!
I grew up mostly with the Haden types, and they grew large in Florida. And so juicy! I've tried the Ataulfo or champagne and found them not as sweet or large.
So when I found them reasonably priced I had to have a flat!
As the week progressed and I awaited them to ripen, I decided to try making my version of cowboy candy using my own bread and butter pickling brine that I use to pickle summer squash in.
Anyone who doesn't know what cowboy candy is, it's basically bread and butter pickled jalapenos. And yes, it's addicting on sandwiches, crackers, snacking.
So, today I set out to make my yummy things.
And today I'll share my cowboy candy recipe with you.
Cowboy Candy
4 lbs of a mix of green jalapenos, and if desired red fresno peppers, washed, stem ends cut off and sliced in 1/4 inch rings
For the brine:
In a large stock pot add
2/3 cup kosher salt
5 cups sugar
2 Tbl mustard seeds
2 Tbl turmeric
2 tsp celery seeds
2 tsp fennel seeds
4 cloves
3 cups apple cider vinegar
2 cups white vinegar
Bring the brine to a rapid simmer over medium heat stirring occasionally.
Ready your jars and lids and have your boiling water bath canner ready.
Pack the raw jalapeno slices into the hot sterile jars leaving 1/2 inch headspace. Ladle the hot brine over the jalapenos just covering them. Wipe your jar rims and threads with a damp paper towel. Seal the jars with hot lids. Process in your boiling water bath for 10 minutes, (adjusting time for altitude). Carefully lift the jars out and let them cool on a folded towel for 24 hours. Yes the peppers will float as they were raw packed, but they will meld with the brine and get plump over the course of a week. Let the flavors meld and serve chilled. YUM!!!
This will make 9 pints of candy!
Mango Thai Pepper Jelly
4 Cups of finely chopped mangoes, about 4 large mangoes
1 cup dried thai chili rings
2 Tbl lime juice
5 3/4 cups sugar
2 finely minced garlic cloves
1/4 cup apple cider vinegar
2 pouches of certo liquid pectin
Puree the mango, chili rings, and garlic and add to a large stock pot. Add the vinegar, lime juice, and sugar and bring to a full rolling boil and then boil for 2 minutes stirring constantly. Add the pectin and cook 1 minute more then remove from heat and skim any foam off.
Ladle into hot sterile jars, wipe the rims with a damp paper towel and seal with hot lids. Process in a boiling water bath for 10 minutes, adjusting time for altitude. Remove the jars and let them cool on a towel for 24 hours.
Makes 8, 1/2 pints.
Please note that for those of us who are celiac, after checking the ingredients of Certo's liquid pectin, it appears that it may be safe for us to use. Although as this summer season comes into swing, I'll be figuring out how to make my own liquid pectin from fruits. :)
Enjoy! Please let us know if you try them and if you liked them!
Thursday, January 22, 2015
Some things I've figured out and tips to be aware of....
Well, as some of you may have noticed over the past year, I have become quite the canning and food preservation addict. I've had so much fun exploring new flavors, trying and picking new to me fruits and vegetables and putting them up to enjoy through the winter until the next season starts. And I will sadly admit that I probably forgot one of the basic cardinal rules of having food intolerances and celiac. That rule is; ALWAYS READ the labels, EVERY Label!
Read the labels of every ingredient you use to help make that jelly or pickles, etc. DUH! I wasn't as diligent as I should have been, much to my body's distress.
My error and glossing over that simple rule is most likely part of the reason I've dealt with gastric issues all winter. Insert embarrassed facepalm here.
I never even thought to check labels on the pectins used to make my jams and jellies. I just figured that pectin = fruit, right? Well I was wrong. Many commercial companies are sneaky, they love adding unnecessary things to products to extend shelf life and cut down costs and amounts of prime ingredients. Blech....
This is one of the main things I discovered.... Many pectins are processed in facilities that also process wheat and soy, many also contain ingredients from corn, like maltodextrin, dextrose, and usually require lots of sugar to make your jams and jellies. And all that sugar isn't good for those that can't be having sugar either.
So I began to research and really start reading labels of commercial pectins. Sadly most all have that little disclaimer that they're made in facilities that also process wheat, most all contain derivatives of corn in the form of maltodextrin or dextrose. Clear jel/gel and Perma Flo are modified corn starches, and they aren't certified GF either or GMO free.
Well, what is someone like me to use to make goodies that call for pectin or clear jel? I can't use corn products or possible products that may have wheat contamination?
A couple options, I can make my own liquid pectin from citrus rind, apples or other high pectin fruits, or find a certified GF pectin commercially. The only one to date that I have found that is simple citrus pectin, gluten free and corn free is Pomona's Pectin. They also will work without sugar or very low sugar. I am hoping to try it out this coming season early until apples and such come into season so I can make some of my own.
For me on the clear jel issue and pie fillings or those recipes calling for clear jel, (it's a ultra fine modified corn starch), I've had to be resourceful on my own and experiment on starches I know are safe for me. And while this isn't officially approved with the national canning associations yet, I've been using Arrowroot starch successfully which takes less than the modified corn starches that are clear jel, perma flo, etc. I found I did not get any separation of the finished product months later, things thickened nicely and quickly and several months in from canning them, still look and taste just fine. Though I will note if you haven't used arrowroot starch in cooking or aren't familiar with it, there are tips and tricks to successfully using it so it doesn't clump and fall to the bottom.
Please understand that I am not recommending you use this starch alternative, I want you to be safe, and follow safe canning practices, I am only stating what I have tried and found successful for my dietary restrictions. And if I find ways to make and thicken things without clear jel, I will certainly share them with you!
I am recommending that if you have intolerances or allergies to foods and such, please, read the labels carefully for all ingredients, unlike myself! Do a little research and source your ingredients from places that can ensure there is no cross contamination, or ingredients that may trigger distress for you. Make your own mixes for pickling, they're simple really, use whole ingredients, fresh things, and be safe as you go along. And I promise that as I go through this coming season, I will certainly be sharing recipes for yummy things to put up to enjoy through the year. And I hope to do so much more than I did this past season.
Read the labels of every ingredient you use to help make that jelly or pickles, etc. DUH! I wasn't as diligent as I should have been, much to my body's distress.
My error and glossing over that simple rule is most likely part of the reason I've dealt with gastric issues all winter. Insert embarrassed facepalm here.
I never even thought to check labels on the pectins used to make my jams and jellies. I just figured that pectin = fruit, right? Well I was wrong. Many commercial companies are sneaky, they love adding unnecessary things to products to extend shelf life and cut down costs and amounts of prime ingredients. Blech....
This is one of the main things I discovered.... Many pectins are processed in facilities that also process wheat and soy, many also contain ingredients from corn, like maltodextrin, dextrose, and usually require lots of sugar to make your jams and jellies. And all that sugar isn't good for those that can't be having sugar either.
So I began to research and really start reading labels of commercial pectins. Sadly most all have that little disclaimer that they're made in facilities that also process wheat, most all contain derivatives of corn in the form of maltodextrin or dextrose. Clear jel/gel and Perma Flo are modified corn starches, and they aren't certified GF either or GMO free.
Well, what is someone like me to use to make goodies that call for pectin or clear jel? I can't use corn products or possible products that may have wheat contamination?
A couple options, I can make my own liquid pectin from citrus rind, apples or other high pectin fruits, or find a certified GF pectin commercially. The only one to date that I have found that is simple citrus pectin, gluten free and corn free is Pomona's Pectin. They also will work without sugar or very low sugar. I am hoping to try it out this coming season early until apples and such come into season so I can make some of my own.
For me on the clear jel issue and pie fillings or those recipes calling for clear jel, (it's a ultra fine modified corn starch), I've had to be resourceful on my own and experiment on starches I know are safe for me. And while this isn't officially approved with the national canning associations yet, I've been using Arrowroot starch successfully which takes less than the modified corn starches that are clear jel, perma flo, etc. I found I did not get any separation of the finished product months later, things thickened nicely and quickly and several months in from canning them, still look and taste just fine. Though I will note if you haven't used arrowroot starch in cooking or aren't familiar with it, there are tips and tricks to successfully using it so it doesn't clump and fall to the bottom.
Please understand that I am not recommending you use this starch alternative, I want you to be safe, and follow safe canning practices, I am only stating what I have tried and found successful for my dietary restrictions. And if I find ways to make and thicken things without clear jel, I will certainly share them with you!
I am recommending that if you have intolerances or allergies to foods and such, please, read the labels carefully for all ingredients, unlike myself! Do a little research and source your ingredients from places that can ensure there is no cross contamination, or ingredients that may trigger distress for you. Make your own mixes for pickling, they're simple really, use whole ingredients, fresh things, and be safe as you go along. And I promise that as I go through this coming season, I will certainly be sharing recipes for yummy things to put up to enjoy through the year. And I hope to do so much more than I did this past season.
Sunday, January 18, 2015
Loving foods - Tinga de Pollo recipe
It's no secret, I love good foods, foods that have depth of flavors, easy to make and that feeling of contentment when others enjoy the fruits of your labor. I also love surprising friends and family with new dishes and flavors.
Such is this recipe. I have loved traditional Mexican dishes for many years now. I probably love them more than most New Mexican dishes, and I certainly prefer them over Tex-Mex style foods. The traditional dishes are so full of flavor, a nice warmth from the peppers and spices, and they are comfort foods.
Any how, I made this dish, (one of my favorites) for a friend's Mexican food themed pot luck birthday supper. I believe everyone enjoyed it as I didn't have too much in the way of left overs!
It is probably one of my favorites, and I got hooked on it when a friend of mine in Santa Fe had a restaurant for a brief time and this was on her menu. YUM!
And yes, it is gluten-free, and no, sorry, I forgot to get pictures. But trust me, make it for yourself and fall in love..... :)
Tinga de Pollo
2-3 Boneless chicken Breasts
2 cloves, whole
2 cloves of garlic smashed
Simmer the chicken with the cloves and garlic in water, just enough to cover, until very tender and easily shredded.
4 large cloves of garlic - minced
2 tomatoes, roasted
5 chipotles en adobo
2 Tbl adobo sauce
1 cup chicken stock
2 tsp cumin (I prefer to use one tsp)
1/2 tsp nutmeg
1/2 tsp oregano
1/2 tsp thyme
1/2 tsp marjoram
2 Tbl olive oil
1 large onion, peeled, halved and sliced
1 large roasted anaheim green chili, peeled and roughly chopped
Blend together the roasted tomatoes, chipotles, adobo sauce, stock, and spices until smooth.
In a medium stock pot, heat the oil over medium-high heat and saute the minced garlic and onions until soft.
Add the tomato mix and bring to a simmer for one minute.
Add the chicken and the chopped green chili, reduce heat to low and let simmer until sauce is reduced by half. Season with salt and pepper to taste.
Serve with rice or tortillas for soft tacos.
Though I do need to warn you, this dish does have some heat, but it's not so hot that you can't taste the flavors. If you want it milder, leave out the green chili.
And I managed to make some nice flexible soft tortillas for myself that are not only gluten-free, but corn-free also. They stayed pretty soft and pliable, tasted very good though I am not sure they're the best for soft tacos. I may have to play with them a bit more to see how to get them to stand up for tacos. But they were good! Despite using a store bought flour mix! No sticky dough and easy to handle.
Soft GF flour tortillas
2 1/2 cups flour blend (I used Mama's Almond flour blend)
1 tsp sea salt
1/2 tsp baking powder
1/3 cup lard or coconut oil
1 cup hot water
mix the dry together and cut in the lard/coconut oil using a pastry blender or two knives, until the flour looks like very grainy sand. Slowly add the hot water, little by little until the dough comes together and is easily handled and not sticky. You don't want it too dry though!
Knead the dough a bit until smooth and let it rest for about 20-30 minutes covered with a damp towel.
Heat a large skillet or griddle.
Divide the dough into 8-10 balls and using 2 pieces of parchment paper, press flat using either a tortilla press or a large flat bottomed pot. Press as thin as you like.
Peel the top piece of parchment off and using the bottom piece, flip the tortilla into the hot skillet and peel off the bottom piece of parchment. Let the tortilla cook about 2 minutes and carefully flip it over and cook another two or so minutes, then flip it one more time.
Remove the tortilla and let it cool a little on a place. Then place it into a zip lock bag while warm. Repeat until all the tortillas are made.
Tip: putting them into the zip lock bag while warm will ensure they stay moist and pliable if you don't eat them all right then and there!
As I said, I really did like the flavor of these, though I suspect the rice flour in the mix may have been one reason they didn't hold up so well for soft tacos. I think I'll try them again, using a bit more coconut oil and less water, that may help make a bit of a difference or try from scratch making my own flour blend. Either way, when I do make them again, I'll post updates. These still would be fab for wraps or a burrito!
Let me know if you try either recipe and how it came out for you and what you think of the Tinga de Pollo if you make it. It really is good and one of my favorites!
Such is this recipe. I have loved traditional Mexican dishes for many years now. I probably love them more than most New Mexican dishes, and I certainly prefer them over Tex-Mex style foods. The traditional dishes are so full of flavor, a nice warmth from the peppers and spices, and they are comfort foods.
Any how, I made this dish, (one of my favorites) for a friend's Mexican food themed pot luck birthday supper. I believe everyone enjoyed it as I didn't have too much in the way of left overs!
It is probably one of my favorites, and I got hooked on it when a friend of mine in Santa Fe had a restaurant for a brief time and this was on her menu. YUM!
And yes, it is gluten-free, and no, sorry, I forgot to get pictures. But trust me, make it for yourself and fall in love..... :)
Tinga de Pollo
2-3 Boneless chicken Breasts
2 cloves, whole
2 cloves of garlic smashed
Simmer the chicken with the cloves and garlic in water, just enough to cover, until very tender and easily shredded.
4 large cloves of garlic - minced
2 tomatoes, roasted
5 chipotles en adobo
2 Tbl adobo sauce
1 cup chicken stock
2 tsp cumin (I prefer to use one tsp)
1/2 tsp nutmeg
1/2 tsp oregano
1/2 tsp thyme
1/2 tsp marjoram
2 Tbl olive oil
1 large onion, peeled, halved and sliced
1 large roasted anaheim green chili, peeled and roughly chopped
Blend together the roasted tomatoes, chipotles, adobo sauce, stock, and spices until smooth.
In a medium stock pot, heat the oil over medium-high heat and saute the minced garlic and onions until soft.
Add the tomato mix and bring to a simmer for one minute.
Add the chicken and the chopped green chili, reduce heat to low and let simmer until sauce is reduced by half. Season with salt and pepper to taste.
Serve with rice or tortillas for soft tacos.
Though I do need to warn you, this dish does have some heat, but it's not so hot that you can't taste the flavors. If you want it milder, leave out the green chili.
And I managed to make some nice flexible soft tortillas for myself that are not only gluten-free, but corn-free also. They stayed pretty soft and pliable, tasted very good though I am not sure they're the best for soft tacos. I may have to play with them a bit more to see how to get them to stand up for tacos. But they were good! Despite using a store bought flour mix! No sticky dough and easy to handle.
Soft GF flour tortillas
2 1/2 cups flour blend (I used Mama's Almond flour blend)
1 tsp sea salt
1/2 tsp baking powder
1/3 cup lard or coconut oil
1 cup hot water
mix the dry together and cut in the lard/coconut oil using a pastry blender or two knives, until the flour looks like very grainy sand. Slowly add the hot water, little by little until the dough comes together and is easily handled and not sticky. You don't want it too dry though!
Knead the dough a bit until smooth and let it rest for about 20-30 minutes covered with a damp towel.
Heat a large skillet or griddle.
Divide the dough into 8-10 balls and using 2 pieces of parchment paper, press flat using either a tortilla press or a large flat bottomed pot. Press as thin as you like.
Peel the top piece of parchment off and using the bottom piece, flip the tortilla into the hot skillet and peel off the bottom piece of parchment. Let the tortilla cook about 2 minutes and carefully flip it over and cook another two or so minutes, then flip it one more time.
Remove the tortilla and let it cool a little on a place. Then place it into a zip lock bag while warm. Repeat until all the tortillas are made.
Tip: putting them into the zip lock bag while warm will ensure they stay moist and pliable if you don't eat them all right then and there!
As I said, I really did like the flavor of these, though I suspect the rice flour in the mix may have been one reason they didn't hold up so well for soft tacos. I think I'll try them again, using a bit more coconut oil and less water, that may help make a bit of a difference or try from scratch making my own flour blend. Either way, when I do make them again, I'll post updates. These still would be fab for wraps or a burrito!
Let me know if you try either recipe and how it came out for you and what you think of the Tinga de Pollo if you make it. It really is good and one of my favorites!
Sunday, October 5, 2014
More yummy and fun canning recipes!
Ok, I'll stand up and admit it. I am a canning addict. I LOVE, love, love! making new and tasting things that will help carry over summer through the cold months.
I recently joined a really fun group of fellow canners on Facebook in my area, and I've been so lucky to have met two of them already! I think we all though, might need an intervention. My sister keeps threatening to give me one and warns me to put down the bucket and step away from the fruit and produce. I can't help it, I love harvesting and picking the amazing goodies and turning them into things I will love all winter.
I did three new ones this weekend, one of them I wasn't sure how the flavors would meld, but they are amazing together. I've been wanting to do a fig jam for a while now as I love figs, and I finally found some locally grown and plump and delicious.
Of course coming from New Mexico, I do love things with chilies. But I am not into the thermonuclear heat of some of them, I love the ones that give you that wonderful earthiness and subtle heat. So when I came across a recipe for a sweet chile sauce, I had to modify it for a jelly to enjoy.
The third recipe was another onion jam, a bit different though, but equally as tasty, it's going to be great to serve at parties.
Ok, I'll quit blathering and get to the recipes.
Let's go with the fig jam, very very tasty!
Fig Jam with Rosemary
6 cups of diced fresh mission figs, stem removed. Dice fine
3/4 cup of sugar
zest and juice of one large lemon
2/3 cup of good port or full red wine
1 Tbl dried rosemary, crushed
1/8 tsp of sea salt
Toss diced figs and sugar in your sauce pot and let stand, stirring occasionally to let the fruit macerate and most of the sugar is dissolved.
Get your water bath canner ready and 4 1/2 pint jars ready to sterilize
Add the remaining ingredients to the figs, bring to a boil, let boil one minute, then reduce the heat and simmer for about 20 minutes until the liquid sheets off your spoon.
Ladle the mixture into your hot sterilized jars leaving 1/4 inch headspace, wipe the rims clean and seal with the hot sterile lids. (yes you might have a little left to put in the fridge and enjoy with breakfast).
Process the jars in a boiling water bath for 10 minutes. Remove the jars and let them cool on a towel. Store out of the light in a cool place.
Sweet Chile Jelly
10 good sized red jalapenos, coarsely chopped, with seeds
2 red serranos, chopped with seeds
6 to 8 cloves of garlic, chopped (I used two huge cloves of elephant garlic)
3/4 cup white vinegar
1 1/2 cup sugar
1 to 1 1/4 cup water
6 tsp sea salt
3 Tbl arrowroot starch
6 Tbl water
Puree the jalapenos, garlic, vinegar, sugar and 1 cup water in food processor or blender. You'd like it to be as smooth as possible. Transfer this mixture to a non-reactive stockpot and bring to a boil. Reduce heat to a low boil and let it cook until it thickens a bit.
Combine the arrowroot and 6 Tbl of water and whisk until smooth. Add this to the pepper mixture and simmer until thickened, adding the last 1/4 cup of water if you like. This only takes a couple of minutes. It gets thick pretty fast.
Ladle into sterilized hot jars (3, half pint jars). Wipe the rims, seal with hot lids and process in a boiling water bath for 10 minutes. Remove jars and let them cool on a towel on the counter.
This is a sweetish jelly with a nice subtle warmth to it. Very nice.....
Onion and Rosemary Jam (small jar on the right)
3 pounds of sweet onions, like Walla Walla or Vidalia (equals 8 to 10 onions approximately)
1 large shallot
1/4 cup grapeseed oil or olive oil
2 - 3 Tbl dried crushed rosemary
2 Tbl dried thyme
3 bay leaves
1/2 tsp chile flakes
3 tsp sea salt
1 tsp black pepper
1/2 cup balsamic vinegar
1/4 cup red wine vinegar
1/8 cup good red wine
1/2 cup honey
1/4 cup sugar
Peel, halve and slice the onions and shallot fairly thin, about 1/4" thick. Heat the oil over medium heat in a large stockpot. Add the onions and stir to coat them then add the rosemary, thyme, bay leaves, chile flakes, salt and pepper. Stir to mix and cover the pot and let the onions cook down until tender, about 15 to 20 minutes. Stirring occasionally.
When the onions have lost most of their liquid, remove the lid and add the remaining ingredients. Bring to a slow boil then reduce the heat slightly and let it simmer, uncovered, stirring occasionally until the liquid is reduced by half. This is about 20 minutes.
Remove the bay leaves and discard them. Let the jam simmer a bit longer, about 10 more minutes.
Ladle into sterilized hot half pint jars, (takes 5), wipe the rims and seal with hot lids. Process in a water bath for 15 minutes. Remove jars and allow them to cool on a towel.
That about covers what I've done this weekend, what about you? Maybe next weekend, I'll try my hand at Hawthorne Jelly! Who knows, maybe my friend and I can corroborate on a new type of jellies that can have added health benefits. :)
Enjoy! And if there is a recipe you want to try and I haven't posted it here yet, I will be happy to do so if you let me know what you're looking for!
I recently joined a really fun group of fellow canners on Facebook in my area, and I've been so lucky to have met two of them already! I think we all though, might need an intervention. My sister keeps threatening to give me one and warns me to put down the bucket and step away from the fruit and produce. I can't help it, I love harvesting and picking the amazing goodies and turning them into things I will love all winter.
I did three new ones this weekend, one of them I wasn't sure how the flavors would meld, but they are amazing together. I've been wanting to do a fig jam for a while now as I love figs, and I finally found some locally grown and plump and delicious.
Of course coming from New Mexico, I do love things with chilies. But I am not into the thermonuclear heat of some of them, I love the ones that give you that wonderful earthiness and subtle heat. So when I came across a recipe for a sweet chile sauce, I had to modify it for a jelly to enjoy.
The third recipe was another onion jam, a bit different though, but equally as tasty, it's going to be great to serve at parties.
Ok, I'll quit blathering and get to the recipes.
Let's go with the fig jam, very very tasty!
Fig Jam with Rosemary
6 cups of diced fresh mission figs, stem removed. Dice fine
3/4 cup of sugar
zest and juice of one large lemon
2/3 cup of good port or full red wine
1 Tbl dried rosemary, crushed
1/8 tsp of sea salt
Toss diced figs and sugar in your sauce pot and let stand, stirring occasionally to let the fruit macerate and most of the sugar is dissolved.
Get your water bath canner ready and 4 1/2 pint jars ready to sterilize
Add the remaining ingredients to the figs, bring to a boil, let boil one minute, then reduce the heat and simmer for about 20 minutes until the liquid sheets off your spoon.
Ladle the mixture into your hot sterilized jars leaving 1/4 inch headspace, wipe the rims clean and seal with the hot sterile lids. (yes you might have a little left to put in the fridge and enjoy with breakfast).
Process the jars in a boiling water bath for 10 minutes. Remove the jars and let them cool on a towel. Store out of the light in a cool place.
Sweet Chile Jelly
10 good sized red jalapenos, coarsely chopped, with seeds
2 red serranos, chopped with seeds
6 to 8 cloves of garlic, chopped (I used two huge cloves of elephant garlic)
3/4 cup white vinegar
1 1/2 cup sugar
1 to 1 1/4 cup water
6 tsp sea salt
3 Tbl arrowroot starch
6 Tbl water
Puree the jalapenos, garlic, vinegar, sugar and 1 cup water in food processor or blender. You'd like it to be as smooth as possible. Transfer this mixture to a non-reactive stockpot and bring to a boil. Reduce heat to a low boil and let it cook until it thickens a bit.
Combine the arrowroot and 6 Tbl of water and whisk until smooth. Add this to the pepper mixture and simmer until thickened, adding the last 1/4 cup of water if you like. This only takes a couple of minutes. It gets thick pretty fast.
Ladle into sterilized hot jars (3, half pint jars). Wipe the rims, seal with hot lids and process in a boiling water bath for 10 minutes. Remove jars and let them cool on a towel on the counter.
This is a sweetish jelly with a nice subtle warmth to it. Very nice.....
Onion and Rosemary Jam (small jar on the right)
3 pounds of sweet onions, like Walla Walla or Vidalia (equals 8 to 10 onions approximately)
1 large shallot
1/4 cup grapeseed oil or olive oil
2 - 3 Tbl dried crushed rosemary
2 Tbl dried thyme
3 bay leaves
1/2 tsp chile flakes
3 tsp sea salt
1 tsp black pepper
1/2 cup balsamic vinegar
1/4 cup red wine vinegar
1/8 cup good red wine
1/2 cup honey
1/4 cup sugar
Peel, halve and slice the onions and shallot fairly thin, about 1/4" thick. Heat the oil over medium heat in a large stockpot. Add the onions and stir to coat them then add the rosemary, thyme, bay leaves, chile flakes, salt and pepper. Stir to mix and cover the pot and let the onions cook down until tender, about 15 to 20 minutes. Stirring occasionally.
When the onions have lost most of their liquid, remove the lid and add the remaining ingredients. Bring to a slow boil then reduce the heat slightly and let it simmer, uncovered, stirring occasionally until the liquid is reduced by half. This is about 20 minutes.
Remove the bay leaves and discard them. Let the jam simmer a bit longer, about 10 more minutes.
Ladle into sterilized hot half pint jars, (takes 5), wipe the rims and seal with hot lids. Process in a water bath for 15 minutes. Remove jars and allow them to cool on a towel.
That about covers what I've done this weekend, what about you? Maybe next weekend, I'll try my hand at Hawthorne Jelly! Who knows, maybe my friend and I can corroborate on a new type of jellies that can have added health benefits. :)
Enjoy! And if there is a recipe you want to try and I haven't posted it here yet, I will be happy to do so if you let me know what you're looking for!
Subscribe to:
Posts (Atom)
