Monday, September 24, 2012

Parmesan Crusted Squash and Eggplant

Guess I haven't posted in awhile, naughty me. Although I can happily say, with the exception of the crab apple wine in the making, I am done with fruit, or at least I hope so. 

Anyhow, thought I would share this easy quick recipe I did for supper this evening. I have plenty of Japanese Eggplant growing in my garden and still have some squash. Well time to use it up and I love both. So I wanted to do something baked with them for supper. 

Well here goes....

Parmesan Crusted Baked Squash and Eggplant

2 medium summer squash or zucchini
2 medium Japanese Eggplant
1 cup Enjoy Life crispy rice cereal
2 Tbl potato starch
1/2 cup parmesan cheese
1 cup buttermilk or coconut milk
salt and pepper to taste
1 Tbl Mrs Dash or herb mix of your choice

Heat the oven to 475 degrees F.
Wash and trim ends of the squash and eggplant. Slice both lengthwise about 1/4 inch thick. 
Line two baking sheets with parchment paper and lightly oil the parchment with olive oil.
Crush the cereal and put in a bowl with starch, parmesan, salt, pepper and Mrs Dash. Mix well. 
Put the butter milk in a shallow dish.
Dip the vegetable slices in the buttermilk and then in the cereal parmesan mixture, coat well and place on the prepared baking sheets. 
bake for 30 miutes until golden and crispy and the veggies are tender.
Enjoy with your favorite dipping sauce if you like. 

I meant to take pictures, well, they didn't make it long enough for that. It is a quick and simple recipe and a good way for kids to get their veggies. And no slimey eggplant and they are crispy. I figure even those who claim they don't like eggplant, will like it this way.

Enjoy!

Friday, September 14, 2012

Buttermilk Brownies!

Ahhhhh, Autumn has arrived, time for those warm comfort foods, like soups and creamy baked things. Although I must confess that a good brownie is welcome at any time of the year.

Therefore the topic of today's post. I needed to make some thing last night for a potluck at work today, and when I volunteered to bring a GF item, everyone asked for my Buttermilk Brownies. For some odd reason when I take them in to share at work, they don't last very long. Gee, wonder why???


This recipe I can't take the full credit for, as a dear friend from Germany, Claudia Rapp shared the original recipe with me. However, I did convert it to Gluten-free and decided on almonds on mine as they're my favorite nut. I've also made it dairy free as I don't tolerate dairy as well as I once used to.

This is the brand of Cacao or Cocoa powder I use. My dear friend and chef who runs the food services here at work at the college gets this for me and turned me on to it. It is probably the MOST heavenly cocoa powder I have ever had or used!

They have several varieties, but the Brute is my favorite, and by itself it smells so delicious. Where to get it? I know you can order some on Amazon, but this specific one he gets for me through his suppliers. So you might be able to get it through a good bakery or restaurant at their cost. Trust me, it's worth it, very worth it. And it makes the most decadent Velvet cakes and cookies!

Ok, I guess I should move on to the recipe, it's early morning yet, and now my mouth is craving chocolate!


Buttermilk Brownies

1 cup unsalted butter or margarine, or 3/4 cup coconut oil
1/2 cup dark organic cocoa powder (I use the Barry's)
1 cup water
2 cups (280g) sifted GF flour mix (use your favorite, I use my cake flour mix)
2 cups sugar or 2/3 cup dark raw agave nectar
1 tsp. baking soda
1/4 tsp sea salt
2 slightly beaten eggs, or flax or chia gel to equal 2 large eggs
1/2 cup buttermilk, or Coconut Milk
1 1/2 tsp vanilla extract (pure)

1/2 cup sliced almonds or chopped nuts (optional)

In a medium sized sauce pot, combine water, cocoa and butter or oil. Bring to a slow boil over medium heat while stirring constantly, when it starts to boil, remove from the heat.
In a large mixing bowl mix the flour, salt, baking soda and sugar together (if using agave hold it aside).
In a small bowl, whisk the eggs with the buttermilk and vanilla, (add the agave if using it) whisk till blended and add the egg mixture to the flour mix. Blend well and slowly add in the cocoa mixture, mix till combined, scraping the sides of the bowl as needed, but don't over mix.
Grease a 15x10 inch pan, pour in the mixture and smooth out. Yes it will be a bit more liquid than you expect.
If you are adding nuts, sprinkle them over the top. You can also add dried cherries if you like, about 1/2 cup.

Bake at 375 degrees F (if using agave bake at 350 degrees) for 20 minutes or until done when a toothpick inserted comes out clean.

No one would know that these are Gluten-free or even dairy free! And I bet they won't last long around your house. They may be a bit more cake like than the heavy "brownie" people have come to expect. Sorry, I'm not into gooey mush. I much prefer these! And until I made these I never liked brownies! Now I'm a convert, er, rather an addict!


Monday, September 10, 2012

Fall, gardens and comfort foods

Well, I don't know about your areas, but here in the southwest, Santa Fe specifically, autumn hit in a hurry this past Saturday. I don't think the temps got above 62 degrees all day. At least the sun came out on Sunday. Which is a good thing as my garden beds aren't done yet producing yummy things.

One of the things still producing are my peppers, nice green bell peppers that are very sweet and Poblanos, which I have plans to stuff another way.

Well with the cooler weather and yummy stuff outside my back door, I decided to make one of my favorite comfort foods.

Stuffed Peppers! Almost good just by themselves, however I usually steam a veggie and or a tossed salad with them. They're pretty easy to make and take a little time, most of the time is spent baking them once stuffed. (sorry, didn't think to take pictures, I'm bad, I know. However, I've had requests for this recipe)

This was my mother's recipe so here goes.

Stuffed Peppers

3 or 4 medium to large sized peppers. (make sure they'll stand up on their own)
1 small onion, chopped
1 lb ground meat, either hamburger or turkey
1 regular sized can of tomato sauce
1 tsp hot sauce, like cholula (optional)
1 tsp garlic powder
salt and pepper to taste
1 cup short grained brown rice, uncooked
1 1/3 cup water or vegetable broth, for rice
1 cup shredded cheeses, your favorite or combo. I like a Mexican blend personally.

Cook the rice according to directions in the water or broth. Lightly oil a covered casserole dish and set aside.

Wash and slice the top of the pepper off (slice them so they will fit upright in the casserole when covered) and remove the seeds and white veins. Remove the stem from the sliced portion of the tops and dice up the pieces.

In a large skillet, brown the meat with spices and hot sauce. When almost browned, add the onion and bell pepper top pieces and cook till just tender. Add the tomato sauce and rice and just heat through. Remove from heat.

Using a serving spoon, fill the peppers with the rice/meat mixture and set in the casserole dish. Use the remaining stuffing (rice mixture to fill in around the peppers. Top with the shredded cheeses.

Cover the dish and bake at 350 degrees for 45 minutes. Let it sit about 10 minutes before serving.

That's it, hearty, filling and always well liked. And the left overs do well reheating for lunches, or you can freeze them in portions to have later. Easy, peasy... :)

Wednesday, August 29, 2012

Adapting a Traditional Recipe to Gluten-free, and Lemon Tea Cakes

I am always on the lookout for tasty looking and yummy recipes. I have found over the years that most of them are very easily adapted to gluten-free.

Let's say you have a family recipe that you have missed so very much since going gluten-free, something like grandmom's special cake. adapting it to be gluten free is easy. It really is! 

Much like the recipe I'm sharing today. The original recipe called for 2 1/2 cups of flour. i have found that when you adapt a wheat flour based recipe to one using gf flours, it is best to go by weight. For general purposes a full cup of wheat flour is about 140 grams. So you would measure out 350 grams of your gf cake flour blend. and depending on your baked items, you may wish to add an appropriate amount of either xanthan or guar gum.

The recipe I found today looked so yummy, I had to try them! Now I will tell you that my cake flour blend is equal parts white rice flour, tapioca flor, and then 1/2 of potato starch. For example; 1 cup each white rice and tapioca, and 1/2 cup potato starch. This I have found is best for cakes and the fluffy type baked goods.

Ok, will warn you, I fully intended to include a picture, but alas, something about blogging off of my iPad, doesn't allow me to add the picture. I do have pictures on my FaceBook page though.

And without further ado....

Lemon Tea Cakes  (adapted from Recipe.com)

1 1/2 c unsalted butter, softened
8 oz. cream cheese, softened
2 1/4 c sugar
5 eggs
3 T lemon juice
2 tsp lemon extract
1 1/2 tsp grated lemon peel
2 1/2 c, 350g flour mix
1 1/2 tsp baking powder
1 tsp gum
1/4 tsp salt
Glaze:
2 1/2 c powdered sugar
1/3 c milk or milk substitute
1 3/4 tsp lemon extract

Heat the oven to 325 degrees F. Grease or line a couple muffin tins, set aside.

In a mixer on medium speed, cream the butter, cream cheese and sugar until light and fluffy. Add eggs, one at a time, beating well after each one. Add the juice, extract and peel. Sift dry ingedients together and add to the bowl at low speed, mixing well.

Fill the muffin cups about 3/4 full and bake for 23 - 25 minutes, until done when a toothpick inserted in the middle comes out clean. Cool in pans for about 10 minutes then remove them from the tins and cool fully on a wire rack.

Make the glaze and either dip the cooled cakes into the glaze or drizzle it over the tops. place them on waxed paper till glaze hardens.

I must say these are very, very tasty, don't think they will last long! Very moist and springy.

A note though, should you decide to make 1/2 the recipe, use 3 medium eggs and 185g of flour mix. 

Monday, August 13, 2012

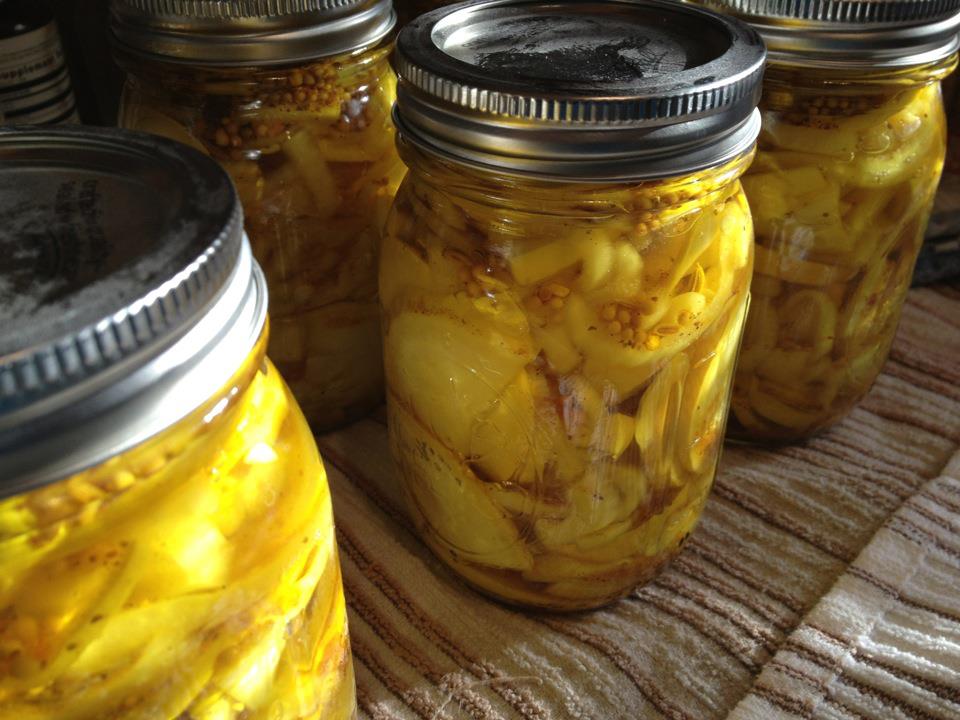
Squash Pickles and Summer Canning


Ah summer, when fruits and veggies are plentiful. Well that is if you take care of your gardens! And despite sharing our harvests, we end up with way more than we can eat normally. Which is ok because there are many ways to preserve all that abundance.

I have always wanted to garner the courage to can or pickle things. But I was always intimidated by the process. Bolstered on by all that I remember from my childhood of the wonderful foods my grandmother put away every year that she shared with us, I finally have waded into canning or pickling.

My first attempt earlier this summer was Rhubarb Strawberry Jam  and a batch of Rhubarb Conserve. And I had success! Now, I've finally figured out it's not all that hard, and you really don't have to have all the fancy canning equipment!. 

So onward.....

For the first time in many years, I have a vegetable garden, I've missed having one terribly and it's been a long time since I have grown all sorts of goodies! I'm growing summer yellow squash, white patty pan squash (two of my faves), beets, kale, chard, green beans, wax beans, and much more yummy stuff! However, due to planting so many plants or seeds rather, I find that I now have an extreme abundance of squash! I've shared with friends and still have more than I can eat! So..... I decided to pickle it based on memories of grandmother's pickled zucchini. I took basic recipe proportions from several ideas and this is what I came up with.

Oh, yeah, and I had one of those monsters that grew hidden, so I had to do something with it as I figured the skin would be too tough at that size!


Pickled Summer Squash, Bread and Butter style.

  • 4 lb yellow squash washed, and sliced into 1/8 to 1/4 inch thick slices, halve the slices if need be.
  • 2 large onions, halved top to bottom, then sliced
  • 1/4 cup plus 1 1/2 teaspoons coarse kosher salt
  • 1 quart crushed ice plush 2 cups ice water
  • 2 1/4 cups distilled white vinegar
  • 1 cup sugar
  • 3/4 cup water
  • 1 tablespoon mustard seeds
  • 1/4 teaspoon ground allspice
  • 1 teaspoon celery seeds
  • 1 tsp turmeric
  • 1 tsp fennel seeds
Wash and sterilize 6, pint canning jars and lids. Fill a large covered stockpot with enough water to cover several jars at a time for the boiling water bath.
 
Place sliced squash and onions in a large non-reactive bowl, sprinkle on the 1/4 cup of kosher salt, mix gently with hands. cover with ice and ice water. Cover the bowl and set aside for 3 to 4 hours to sit. 
 
In a medium non-reactive saucepan, bring the vinegar, sugar, water, mustard seeds, turmeric, fennel seeds, allspice, celery seeds, and remaining 1 1/2 teaspoons canning salt to a boil, then simmer, uncovered, 10 minutes. 
 
Bring the water in the large stockpot to a boil over medium-high to high heat. Remember that the water level will rise with each jar submerged. 
 
Drain the squash and onions and pack into the sterilized pint jars, leaving about 1/2 to 1/4 inch space to the lip of the jar. Ladle or carefully pour in the hot vinegar mixture over the squash covering the squash fully. Use a butter knife to remove air bubbles around the sides of the jars. Wipe clean the rims and threads on the jars. Place on lids and secure the bands down well. 
 
Place the jars, 3 at a time, carefully into the boiling water bath, cover the pot and boil for 10 minutes. Using jar tongs, remove each jar to cool on a towel on the counter. Repeat with the remaining 3 jars.  Allow to cool fully. And for the best flavor, let pickles sit for a week before chilling and enjoying!
You should get these yummy looking lovely yellow pickles!

Now on to my second endeavor this weekend. I love apple butter, and pumpkin butter and have always desired to make peach butter. So with the abundance of large lovely peaches this year, I dove right in to making some. 
And yeah, it's yummy!

Fresh Peach Butter


  • 4 to 4 1/2 lbs fresh washed peaches
  • 2 Tbl lime juice, fresh
  • 1 cup filtered water
  • 2 cups sugar
  • 1 tsp cinnamon
  • 1/2 tsp allspice

Halve the peaches and remove the pits. Slice wedges and cube the slices, placing them in a large stockpot. Now note, you can peel them or not, depends on if you have a food mill or a good processor.

Add the sugar and water to the peaches and bring to a boil over medium-high heat. Reduce to medium and for about 20 or so minutes, or until the peaches are extremely tender. Remove the pot from the heat and in batches, puree the peaches and liquid. Return the puree to the pot and add the lime juice, cinnamon and allspice. Bring the mixture to a simmer and let simmer 30 to 40 minutes until the mixture has thickened.

Bring a large stockpot of water to a boil (for the jar bath).

Spoon butter into sterilized jars. Clean rims and threads of the jars and add a sterilized top and screw closed. Place jars into the boiling water bath, cover and boil for 10 minutes. Using jar tongs, remove to a towel to cool fully.
This recipe makes 3, one pint jars full. Personally, I love the color I got with the beautiful red skins on my peaches. And oh yeah, it's good. I can't wait to use it in bread or on bread or french toast, or gluten-free coconut flour biscuits. I bet it's even good on Brie and crackers!

Now I don't feel as intimidated about canning, I'm looking forward to doing and trying much more, to include grandma's wonderful dilly beans. It really is a good way to preserve summer's harvest to enjoy all year.

Wednesday, August 8, 2012

Yummy stuff and 3 recipes!

First off, I greatly apologize that it has taken me a bit to get this one done. I know, I teased you all with my description of my supper last weekend. And several of you asked for the recipes.

First off, my supervisors, Abby and Brody wholeheartedly approved of my efforts at cooking over the weekend.
They are my constant supervisors, quick to pick up dropped items and make off with whatever you may have dropped faster than you can blink. And the kittens thankfully weren't trying to help me with the fish, they were pretty crashed out after trying to help with the Coconut Flour Biscuits (recipe in a later blog). The kittens are not very polite supervisors, they want to taste it all, and I fear at this stage in their lives, they think I'm a tree for scaling to try to snag any goodies they think I am preparing that they might like. Sigh.... Life is never dull, certainly when you have a few month old kitten hanging from your backside meowing loudly!

Anyhow supervisors aside, these are all gluten-free and even the vegetable casserole could probably be made dairy free using the alternative cheeses, or make a gravy with some starch in the alternative milk and some alternative cheeses. And I think you'll like the fish, so much tastier and crispier than the stuff you get frozen or from Long John Silvers. Certainly much healthier!

What I my supper consisted of, was potato crusted Swai fish fillets, a very creamy cheesy fresh vegetable casserole, and what I called Crispy Crushed potatoes. The potatoes were modified a bit from a recipe by The Pioneer Woman, which I changed some for my tastes. This is her picture so you have an idea what they should look like basically.

Here goes:

My version of Crash Hot Potatoes, which I ended up renaming Crispy Crushed Potatoes

8 to 12 new or fingerling potatoes, I prefer gold potatoes
Olive oil
Sea Salt and Pepper to taste
Herbs of choice, I like basil, chives, oregano, and or rosemary
Grated Romano or Parmesan cheese. (optional)

Boil potatoes over medium high heat until just fork tender. Times will vary based on size and amount. Drain and set aside.

Spread about 1 to 1 1/2 Tbl of olive oil around on a rimmed baking sheet or baking pan.
Put the potatoes on the oiled pan, leaving a bit of space between each of them and smash them with either a potato masher, large serving fork, or even a glass bottom works.
Drizzle a bit more olive oil over each potato, season with salt and pepper, sprinkle with your herbs, and some romano cheeses.

Bake at 450 degrees F. for 20 to 30 minutes, until they're golden and crispy around the edges. Serve!


Creamy Cheesy Vegetable Casserole

1/2 lb fresh broccoli, florets cut off and halved if larger than bite sized
1/2 lb fresh cauliflower, florets cut off and halved if large
1 large carrot, sliced 1/4 inch thick slices
1/2 lb sliced mushrooms (optional)
1 medium onion, sliced vertically in half and then sliced moderately thin
Sea salt and pepper to taste
1 clove minced garlic
1 1/2 cups mixed shredded cheeses, like cheddar, swiss, asadero, jack, your choices
1/2 cup sliced oxaca (mexican farmers cheese) or provolone, (4 to 5 slices)
1 to 1 1/2 Tbl coconut or olive oil
1/2 cup milk or coconut milk

Grease a covered casserole with coconut oil and add chopped vegetables to the dish and set aside.

Heat oil in a skillet over medium heat and add onions, saute till browned and crispy, stirring occasionally. Remove from heat and set aside.

In a saucepan over medium heat, heat the milk and add the shredded cheeses, stirring constantly until the cheeses are melted and gooey, and you have a thick smooth cheese sauce. Stir in the garlic and salt and pepper.

Pour the cheese sauce over the vegetables. Spread the crisped onions over the top, and top with the sliced cheese. Cover and bake at 350 degrees F for 40 minutes, or until vegetables are just tender. Remove lid and bake another 5 to 10 minutes until the top is golden and bubbly. Remove from oven and let sit 10 to 15 minutes before serving.

Potato Crusted Fish Fillets

2 to 3 Swai or Tilapia fish fillets, rinsed and patted dry
2 to 3 Tbl of potato starch
1/4 cup milk or milk substitute
1 to 1 1/2 cups potato flakes
lemon pepper to taste
1 to 2 Tbl Olive oil for frying

Place starch on a plate or in one ziploc bag, the potato flakes and lemon pepper on or in another plate/bag.
Pour milk into a shallow dish.
Dredge the fillet in the starch, shake of excess and then dip in the milk, and then dredge in the potato flakes. Place fillets on a plate and chill for 15 to 30 minutes to firm up.
Heat the oil in a skillet over medium heat. Fry fillets until golden on both sides and fish flakes easily with a fork. About 5 to 7 minutes per side depending on the thickness of the fillet. Remove to a paper towel lined plate and pat off any excess oil. Serve with your favorite topping or sauce. I usually make my own tartar sauce with mayo and some sweet or dill relish, or get fancy and make a tartar sauce with roasted chopped green chili and a little onion salt, New Mexican Style!

Yes supper was that easy, and very tasty.

Thursday, July 26, 2012

Comfort Foods and simple suppers

Yesterday was one of those crazy days at work, and by the time I got home, all I wanted was a comfort food. One that was quick to make and filling, and meatless. Yes, I try to have a day or meal several times a week without meat. I figure I eat too much of it, so cutting back is a good thing for me.

So, as I had a craving for eggs, (and yes, they're excellent for supper too!), I remembered that a great way to use up leftovers or those goodies that are in your fridge that need to be used, is to make a Tortilla de Espana, also known as the Spanish Omelet.

Well, I had leeks in the fridge, some onion, potatoes, and some great squash from my rather abundant squash plants.

Personally, I love squash, and with as much as my plants are putting out (bigger now than in the picture) I have been quite creative with them.

So I set out to create our supper, and provide me with excellent leftovers for lunch the remainder of the week. And this is the finished product. YUM!
This is exceptionally easy to make, can't mess it up, it's a one pot or skillet meal, and is a very good way to use up leftovers, including meat leftovers if you like. I also had a fresh tomato that I wanted to use and thought it would be excellent as a topping under the cheese.

And by the way, I'll tell you now, I love goat cheeses and the traditional Mexican cheeses like Cotija, Asadero, and Oxaca. They usually are made from raw milks, and I seem to handle them better than most commercial cheeses. And in my humble opinion, the Asadero and Oxaca cheeses are absolutely the best when melted, all gooey, taste excellent, and better gooey than even mozzarella.

So I'll put down the ingredients as I used them last night, and how to make it. You can modify the ingredients however you like.

Tortilla de Espana / Spanish Omelet

10 inch cast iron skillet or other oven safe skillet (I do prefer cast iron for this)
6 to 8 eggs
1/4 cup milk or other milk. (I use So Delicious' plain coconut milk)
1/4 cup Italian blended shredded cheeses
1/2 medium onion, chopped
1 medium to large squash, halved and sliced
2 medium to small potatoes, precooked in the microwave (8 minutes) halved and sliced
1 large leek, washed, halved, and sliced
2 to 3 cloves minced garlic
1 large tomato, sliced for top
6 oz. Mexican Oxaca cheese or other cheese of choice. Sliced for top.
2-3 Tbl coconut or olive oil to saute with.
Salt and pepper to taste
1 tsp thyme
1 tsp oregano

Slice and chop the leeks and onions and garlic and set aside. Pre-cook the potatoes and let cool a bit before slicing, then set them aside. Slice the squash and set aside.
In a medium sized bowl,  whisk the eggs, milk, salt, pepper, thyme and oregano. Then whisk in the shredded Italian cheeses.

Heat the oven to 325 degrees F.

Heat the skillet and coconut oil over medium to medium-high heat. Saute the leeks, onions and garlic till tender, add the squash and saute till just tender but still firm. Add the potatoes and stir to mix. Pour the egg mixture over and stir to ensure all in the pan is coated. Turn heat down to between medium and medium-low and let cook until the eggs are almost set.

Arrange the tomatoes on top, and cheese over the tomatoes. Remove the skillet from the stovetop and place in the oven for about 20 minutes to finish cooking the eggs and the cheese is all melted.

Remove from the oven and let sit for about 10 to 15 minutes before slicing and serving. Serve with a tossed salad if you like!

As I mentioned, you can use most any ingredient in it you'd like. Try left over quinoa or rice instead of potatoes, roasted peppers, bacon or ham, or left over roast sliced into strips. You can use any type of cheeses or cheese combinations you'd like. Possibilities are endless. It's a quick, one pot/skillet meal and so there's less mess in your kitchen!