Ok, I don't have pictures, so you'll have to build your own mental picture of the ultimate melt in your mouth flaky pie crust.
I made this crust off the cuff for Christmas dessert for my sister, she wanted a Cherry Pie, but really didn't give me enough fruit to fill one from scratch, so it became Cherry and Blueberry pie.
Personally, in my humble opinion, this crust is the absolute best I've made or had since going gluten-free so long ago. This crust is very flaky, and melts in your mouth. And really it's easy to make, just need a little time for it.
I doubled the recipe to make a double crust for fruit pie. And I must say there weren't many left overs, yeah, the family LOVED it!
Here goes, double the recipe if you need to make two pies or a top crust.
1 1/4 cup of my cake flour blend (175g)
1/4 cup Almond meal (flour) (35g)
1/2 tsp xanthan gum
1/2 tsp sea salt
2 tsp cane sugar
4 Tbl cold butter or 3 Tbl cold coconut oil
3 to 5 Tbl Ice water
1-2 Tbl cane sugar (optional, to sprinkle on top)
1 egg yolk lightly beaten, or 1 tbl buttermilk, your choice.
Mix flour blend, almond flour, gum, salt and 2 tsp sugar together. Cube the butter or oil in small cubes and cut into the flour until it's pebbly, and it's ok if you have some large pebbles, do not overwork the flour. Slowly add in the ice water 1 Tablespoon at a time until the flour mixture comes together and you can form a cohesive ball in your hand.
At this point stop working the flour and turn out onto a piece of parchment paper. Work it just enough to form a disk (if doubling, halve the dough and form 2 disks). Wrap the disks in parchment paper and put in the refrigerator.
Now, you can let it chill at minimum for 1 hour, I put mine in overnight, the longer it can chill the better. . Remove one disk and roll out between parchment paper, fold over twice, and roll out to 1/8 to 1/4 inch thick in a circle, enough for a 9 inch pie plate, and gently form into the ungreased pie plate. Place the plate and bottom crust in the fridge if you are doing a 2 crust recipe and have to roll out the top. And it's OK if you still have little pebbles of butter/coconut oil dotting the flour! This makes the flakes and melt in your mouth goodness!
If you are doing a fruit pie, make sure your filling is cool (if you made from scratch) and pour your filling into the chilled pie shell. Cover with the top crust, and pinch the edges or flute them to close them. Cut slits into the top, if you have left over crust from the edges, you can make fancy little toppers.
Brush the top crust with the egg yolk or buttermilk (you can sub coconut cream for the buttermilk) and be sure to get the edges. Sprinkle the top with some sugar and bake your pie as directed.
If you are doing a single crust pie, brush the bottom with a little yolk or buttermilk, use a fork to poke a few holes in the bottom and bake at 375 degrees F for 10 to 12 minutes in the center rack of the oven. You want it to just starting to turn golden. Remove and cool fully before filling with your pumpkin or other filling. Then bake as you normally would for the pie recipe.
The yolk gives a nice golden color and really helps the crust get that ultra flaky top, the kind when you put your fork into it, flakes into those pieces you want to consume immediately!
You can also use it for a savory pie like quiche, omit the sugars.
Try it and let me know what you think! I would love to hear how it worked for you!
My Cake flour mix is as follows:
1 cup (140g) white rice flour or blend of white and brown rice flour
1 cup (140g) tapioca flour
1/2 cup (70g) Arrowroot or potato starch
You can mix this up and store it in a jar in the fridge. Makes for very moist cakes and cupcakes too!
Friday, February 1, 2013

Friday, January 11, 2013
One of my Family's Favorites, Sauerkraut Bread
Well.... sorry about not posting more, spring term here at the college I work for is starting to wind up, so things have been busy as everyone seems to need to make changes. So, as a result, I haven't done much baking or cooking much less blogging.
BUT... I do want to share this recipe with you! My family's recipe of Sauerkraut Bread. It's filling, warm and very good! It's something my grandmother passed down and I remember loving it as a kid when my mother did make it. It's a meal, all wrapped up, and extra portions freeze well for lunches or a quick meal (if you're single like me) for later.
Although I now make it gluten-free and with my own homemade sauerkraut, I think it's even better. YUM!
I will mention to you now, that making your own sauerkraut is absolutely the best! It's much better than anything store bought, and it is so easy to make. Making it takes a bit of time to ferment and a little bit of labor on your part, think of it as squeezing all the moisture out of the cabbage. The recipe I started with was from The Nourished Kitchen, and I will say that her guides to fermenting and why to ferment some foods is wonderful and worth reading. The only alteration I made to her recipe was to add about 1/4 to 1/2 cup of fresh whey that I had from making all my wonderful Goat's Milk yogurt and making it greek style or into cream cheese. I've also made her fermented chili sauce that rocked! It's made me want to learn so much more about fermenting beyond wine making.
This is the link to her Sauerkraut recipe: Homemade Sauerkraut It really is easy and wonderful to enjoy!
 These are much like Empanadas or Pasties if you like. And I would suggest using an empanada press or cutter to make the rounds with. Makes it easier.
I have also found that using Chebe's basic bread mix works the best and really does make a nice finished product. And it's easy to roll out and work with. Personally, I love Chebe's mixes, though I have yet to try the cinnamon roll mix. But I love the pizza dough mix too!
It is good for kids to enjoy too as they can pick it up to munch on it. And using your own sauerkraut won't give that vinegary bite that jarred sauerkraut can have. If you use sauerkraut from a jar, I will recommend that you drain it well and/or rinse it if it's too strong for you.
 Ok, here goes......
Sauerkraut Bread
1 package of Chebe's Basic Bread mix, mixed up according to directions without cheese.
1/2 lb ground meat
1 1/2 to 2 cups of sauerkraut, drained
1/2 onion, sliced thin and slices quartered
1/3 cup chopped mushrooms
1 tsp basil
salt and pepper to taste
1 tsp garlic powder
Optional: 6 slices of Oaxaca cheese sliced 1/4 thick about 1 1/2 to 2 inches in length
One egg yolk beaten for brushing on tops
Heat the oven to 375 degrees F. Line a baking sheet with parchment paper and set aside.
Brown the ground meat in a skillet with onions, and spices. While the meat is browning, make the bread mix and roll out to about 1/4 inch thick between parchment paper. Using a 4 inch empanada press/cutter cut out the circles of dough, rolling scraps out again, you should get about 6 rounds.
When the meat is browned, add the mushroom pieces and sauerkraut and heat through, till mushrooms are becoming tender. Remove the skillet from the heat.
If you're adding the cheese, place a slice on each round on one side towards the middle. Add about 3 tablespoons of the meat mixture on top. Fold the dough over and press the edges together and place on your baking sheet. When all are assembled, brush the egg yolk over the tops and bake for 18 to 20 minutes until nice and golden. Remove from the oven, let rest for a few minutes and serve.
They go exceptionally well with a salad and if you like you can serve them with a pat of butter brushed onto the tops. One of the reasons I used Oaxaca cheese is that I love the chew when melted and the buttery flavor of it. YUM!
If you try these, let me know how they turned out and how you liked them! I would love to hear from you!
BUT... I do want to share this recipe with you! My family's recipe of Sauerkraut Bread. It's filling, warm and very good! It's something my grandmother passed down and I remember loving it as a kid when my mother did make it. It's a meal, all wrapped up, and extra portions freeze well for lunches or a quick meal (if you're single like me) for later.
Although I now make it gluten-free and with my own homemade sauerkraut, I think it's even better. YUM!
I will mention to you now, that making your own sauerkraut is absolutely the best! It's much better than anything store bought, and it is so easy to make. Making it takes a bit of time to ferment and a little bit of labor on your part, think of it as squeezing all the moisture out of the cabbage. The recipe I started with was from The Nourished Kitchen, and I will say that her guides to fermenting and why to ferment some foods is wonderful and worth reading. The only alteration I made to her recipe was to add about 1/4 to 1/2 cup of fresh whey that I had from making all my wonderful Goat's Milk yogurt and making it greek style or into cream cheese. I've also made her fermented chili sauce that rocked! It's made me want to learn so much more about fermenting beyond wine making.
This is the link to her Sauerkraut recipe: Homemade Sauerkraut It really is easy and wonderful to enjoy!
I have also found that using Chebe's basic bread mix works the best and really does make a nice finished product. And it's easy to roll out and work with. Personally, I love Chebe's mixes, though I have yet to try the cinnamon roll mix. But I love the pizza dough mix too!
It is good for kids to enjoy too as they can pick it up to munch on it. And using your own sauerkraut won't give that vinegary bite that jarred sauerkraut can have. If you use sauerkraut from a jar, I will recommend that you drain it well and/or rinse it if it's too strong for you.
Sauerkraut Bread
1 package of Chebe's Basic Bread mix, mixed up according to directions without cheese.
1/2 lb ground meat
1 1/2 to 2 cups of sauerkraut, drained
1/2 onion, sliced thin and slices quartered
1/3 cup chopped mushrooms
1 tsp basil
salt and pepper to taste
1 tsp garlic powder
Optional: 6 slices of Oaxaca cheese sliced 1/4 thick about 1 1/2 to 2 inches in length
One egg yolk beaten for brushing on tops
Heat the oven to 375 degrees F. Line a baking sheet with parchment paper and set aside.
Brown the ground meat in a skillet with onions, and spices. While the meat is browning, make the bread mix and roll out to about 1/4 inch thick between parchment paper. Using a 4 inch empanada press/cutter cut out the circles of dough, rolling scraps out again, you should get about 6 rounds.
When the meat is browned, add the mushroom pieces and sauerkraut and heat through, till mushrooms are becoming tender. Remove the skillet from the heat.
If you're adding the cheese, place a slice on each round on one side towards the middle. Add about 3 tablespoons of the meat mixture on top. Fold the dough over and press the edges together and place on your baking sheet. When all are assembled, brush the egg yolk over the tops and bake for 18 to 20 minutes until nice and golden. Remove from the oven, let rest for a few minutes and serve.
They go exceptionally well with a salad and if you like you can serve them with a pat of butter brushed onto the tops. One of the reasons I used Oaxaca cheese is that I love the chew when melted and the buttery flavor of it. YUM!
If you try these, let me know how they turned out and how you liked them! I would love to hear from you!
Tuesday, December 18, 2012
A Wonderful Simple Seafood Stew!
Oh YUM! After making this simple stew and eating some, I thought I'd died and gone to heaven! This really is a simple stew to make, quick and very filling.
 The only fresh ingredient I didn't use was the clams, I needed the juice for the recipe. Snow's is a good brand.

Fresh Salmon and Swai, cubed into 1 to 2 inch cubes


Fresh shrimp, peeled and deveined......
 And here goes....
Seafood Stew
1/4 cup olive oil
4 cloves of garlic crushed
1 medium shallot, minced
1 can of fire roasted diced tomatoes with the juice
1 1/2 cup clam juice or fish stock (save the juice from your can of clams and add a bit of water to make the cup and a half)
1/2 cup dry white wine
1 lb of skinned fish, You can use one type or several, I used salmon and Swai, cubed into 1-2 inch cubes
1 can of minced clams, drained and juice reserved
1/2 lb large peeled and deveined shrimp
1/2 lb sea scallops (optional)
1 Tbl minced parsley
1 Tbl basil
Heat the oil in a stockpot over medium high heat. Saute the garlic and shallot till fragrant and tender, approximately 2 minutes. Add the parsley and basil and cook one more minute.
Add in the tomatoes, clam juice and wine. Bring to a boil, lower heat to medium low, cover and simmer 10 to 15 minutes. Add the seafood, cover and simmer 10 to 15 more minutes until fish is done and tender.
It's good served with crusty gluten free french bread or garlic bread. A very filling and satisfying meal! Oh yummy and so happy I have some leftovers! I imagine you could also add in crab or oysters, what ever tickles your fancy at the time of making or what's available.

Fresh Salmon and Swai, cubed into 1 to 2 inch cubes


Fresh shrimp, peeled and deveined......

Seafood Stew
1/4 cup olive oil
4 cloves of garlic crushed
1 medium shallot, minced
1 can of fire roasted diced tomatoes with the juice
1 1/2 cup clam juice or fish stock (save the juice from your can of clams and add a bit of water to make the cup and a half)
1/2 cup dry white wine
1 lb of skinned fish, You can use one type or several, I used salmon and Swai, cubed into 1-2 inch cubes
1 can of minced clams, drained and juice reserved
1/2 lb large peeled and deveined shrimp
1/2 lb sea scallops (optional)
1 Tbl minced parsley
1 Tbl basil
Heat the oil in a stockpot over medium high heat. Saute the garlic and shallot till fragrant and tender, approximately 2 minutes. Add the parsley and basil and cook one more minute.
Add in the tomatoes, clam juice and wine. Bring to a boil, lower heat to medium low, cover and simmer 10 to 15 minutes. Add the seafood, cover and simmer 10 to 15 more minutes until fish is done and tender.
It's good served with crusty gluten free french bread or garlic bread. A very filling and satisfying meal! Oh yummy and so happy I have some leftovers! I imagine you could also add in crab or oysters, what ever tickles your fancy at the time of making or what's available.
Monday, December 17, 2012
A Few of My Favorite things
Ah yes, tis that time of year. The time of year when we do a LOT of baking. I don't know why we tend to do more of our baking to share and enjoy ourselves at this time of year, but we do.
 It's a good time of year to share a little bit of goodness with family and friends. I don't know about you, but my friends and coworkers look forward to me bringing in goodies for them to enjoy, even when they themselves are not gluten-free. All they know is that they taste good and disappear fast!
So, I thought I'd share some of my favorite holiday cookie pics and recipes..... These are the easy ones to make and they're good and do tend to disappear quickly. It always makes me feel good to know folks enjoy my efforts.
This one is a traditional favorite in my family, the recipe was handed down from my grandmother and I've always loved them. I've adapted it Gluten-free, and I think I personally prefer Pistachios for the nuts in them, but they're usually made with chopped pecans.
Nuggets (also known as Russian Tea Cakes)
 1/2 cup + 1 Tbl of butter
1 cup (140g) flour mix of your choice
2 Tbl of sugar
1/8 tsp of salt
1 tsp pure vanilla extract
1 cup chopped pecans (or nuts of your choice)
1/2 cup confectioner's sugar (for rolling)
Heat the oven to 350 degrees F.
Mix together butter, sugar, salt and vanilla till combined, add flour and mix well. Add nuts. Let it sit for a few minutes. Using a Tablespoon, roll dough into 1 inch balls and place on parchment lined baking sheet, 1/2 to 1 inch apart.
Bake for 20 minutes or until golden. While cookies are hot roll them in the confectioner's sugar and place on a wire rack to cool.
Oh yeah, by the way, they positively melt in your mouth!
Butter Cookies/Thumbprint Cookies
 These could be made using coconut oil in lieu of butter, but you would use about 1/4 to 1/3 less the amount called for. And you could use a dairy free greek style yogurt in lieu of the cream cheese or a dairy free cream cheese. If you use the yogurt, you may probably need to adjust the flour quantity a little.
1/2 cup + 1Tbl butter
4oz. (1/2 cup) cream cheese
1 1/4 cup confectioner's sugar
1 egg
1 1/2 tsp pure vanilla extract
1/4 tsp salt
1/4 tsp baking powder
1 cups minute 3 tbl (approx. 415g) flour mix
Jam or jelly of your choice.
Heat the oven to 350 degrees F. Sift the dry ingredients together except sugar, and set aside. Line 2 baking sheets with parchment paper and set aside.
Cream the butter and cream cheese together. Add the sugar slowly and beat well. Add the egg and vanilla and mix until smooth. Slowly add the dry ingredients, scraping the sides of the bowl as necessary, mix until well incorporated.
Let the dough sit for about 15 minutes. Using a spoon, make 1 inch balls of the dough and set on the lined baking sheets about 1 inch apart. Using your thumb, make a well in the center of each cookie. Fill the wells with a bit of jam or jelly, (I used my homemade Rhubarb Strawberry Jam this time) About 1/4 tsp or so.
Bake for 30 minutes, until bottom edges are just turning golden. Remove to a wire rack to cool.
This recipe is from King Arthur Flours, it is one of their gluten free recipes, however, I did modify it a little. Still very good!
Orange-Vanilla Shortbread
 As I didn't have an orange for this attempt, I used Tangerines, which are still just as good. And I used the juice of one, about 1 Tbl.
1 1/2 cup (24Tbl) softened butter
3/4 cup cane sugar
1-2 Tbl grated orange rind
1 1/2 tsp pure vanilla extract
1 Tbl orange juice
3 large egg yolks
3 cups (420g) flour mix
1/2 tsp gum
1/2 tsp salt
Heat oven to 350 degrees F. Line a 9x12 or 13 baking dish with parchment paper, or grease the pan (you will find it easier to line it in the long run) and set aside.
Cream the butter and sugar together until light and fluffy. Add the zest, juice and vanilla beating until incorporated. Add the yolks one at a time beating well after each.
Sift the flour, gum and salt together and slowly beat into the butter mixture. Mix until combined.
Spoon in the mixture to the lined dish and press and smooth it into the dish. Press down a little to firm it up a touch.
Bake for 30 to 35 minutes until the edges are becoming golden. Set the pan on a wire rack to cool for about 10 to 15 minutes. then using the paper, lift out the shortbread and cut into 1 inch squares. Let them finish cooling fully before serving.
They were very good, and although the original recipe did not call for pressing it into the dish, if you don't they'll crumble and you'll have lots of shortbread crumbs for a crust.
I hope you all have a wonderful holiday season, enjoy your family and friends, hug them while you can, and never forget to tell them you love them and appreciate them.
What are you all making this year for goodies?

So, I thought I'd share some of my favorite holiday cookie pics and recipes..... These are the easy ones to make and they're good and do tend to disappear quickly. It always makes me feel good to know folks enjoy my efforts.
This one is a traditional favorite in my family, the recipe was handed down from my grandmother and I've always loved them. I've adapted it Gluten-free, and I think I personally prefer Pistachios for the nuts in them, but they're usually made with chopped pecans.
Nuggets (also known as Russian Tea Cakes)

1 cup (140g) flour mix of your choice
2 Tbl of sugar
1/8 tsp of salt
1 tsp pure vanilla extract
1 cup chopped pecans (or nuts of your choice)
1/2 cup confectioner's sugar (for rolling)
Heat the oven to 350 degrees F.
Mix together butter, sugar, salt and vanilla till combined, add flour and mix well. Add nuts. Let it sit for a few minutes. Using a Tablespoon, roll dough into 1 inch balls and place on parchment lined baking sheet, 1/2 to 1 inch apart.
Bake for 20 minutes or until golden. While cookies are hot roll them in the confectioner's sugar and place on a wire rack to cool.
Oh yeah, by the way, they positively melt in your mouth!
Butter Cookies/Thumbprint Cookies

1/2 cup + 1Tbl butter
4oz. (1/2 cup) cream cheese
1 1/4 cup confectioner's sugar
1 egg
1 1/2 tsp pure vanilla extract
1/4 tsp salt
1/4 tsp baking powder
1 cups minute 3 tbl (approx. 415g) flour mix
Jam or jelly of your choice.
Heat the oven to 350 degrees F. Sift the dry ingredients together except sugar, and set aside. Line 2 baking sheets with parchment paper and set aside.
Cream the butter and cream cheese together. Add the sugar slowly and beat well. Add the egg and vanilla and mix until smooth. Slowly add the dry ingredients, scraping the sides of the bowl as necessary, mix until well incorporated.
Let the dough sit for about 15 minutes. Using a spoon, make 1 inch balls of the dough and set on the lined baking sheets about 1 inch apart. Using your thumb, make a well in the center of each cookie. Fill the wells with a bit of jam or jelly, (I used my homemade Rhubarb Strawberry Jam this time) About 1/4 tsp or so.
Bake for 30 minutes, until bottom edges are just turning golden. Remove to a wire rack to cool.
This recipe is from King Arthur Flours, it is one of their gluten free recipes, however, I did modify it a little. Still very good!
Orange-Vanilla Shortbread

1 1/2 cup (24Tbl) softened butter
3/4 cup cane sugar
1-2 Tbl grated orange rind
1 1/2 tsp pure vanilla extract
1 Tbl orange juice
3 large egg yolks
3 cups (420g) flour mix
1/2 tsp gum
1/2 tsp salt
Heat oven to 350 degrees F. Line a 9x12 or 13 baking dish with parchment paper, or grease the pan (you will find it easier to line it in the long run) and set aside.
Cream the butter and sugar together until light and fluffy. Add the zest, juice and vanilla beating until incorporated. Add the yolks one at a time beating well after each.
Sift the flour, gum and salt together and slowly beat into the butter mixture. Mix until combined.
Spoon in the mixture to the lined dish and press and smooth it into the dish. Press down a little to firm it up a touch.
Bake for 30 to 35 minutes until the edges are becoming golden. Set the pan on a wire rack to cool for about 10 to 15 minutes. then using the paper, lift out the shortbread and cut into 1 inch squares. Let them finish cooling fully before serving.
They were very good, and although the original recipe did not call for pressing it into the dish, if you don't they'll crumble and you'll have lots of shortbread crumbs for a crust.
I hope you all have a wonderful holiday season, enjoy your family and friends, hug them while you can, and never forget to tell them you love them and appreciate them.
What are you all making this year for goodies?
Thursday, December 6, 2012
Yummy easy Salvadoran Quesadillas

These are adapted from a basic recipe, that used sugar and butter, and that is already gluten free. I've made them two ways, with the sugar and butter in the original recipe, and I have used honey and coconut oil in stead of the sugar and butter. Personally they're much better with the honey and coconut oil. They're moister, and have that wonderful honey in them. Which reminds me of when I used to put butter and honey on my cornbread when I could have it. Coconut oil lends a richness of flavor and a rich feeling to the mouth as you eat them in my humble opinion.
And yes, they really are heavenly!

They're good for a nice treat with your meal or at the breakfast table. And because I make them with Honey and coconut oil, they're better for you in some regards. No processed sugar, and you get the good fats.

So, here goes.... give them a try and let me know what you think!
Gluten Free Salvadoran Quesadillas
140 g Rice flour (white or brown) (1 cup)
¼ cup Golden Flax Meal
1 tsp baking powder
pinch of sea salt
1 cup Honey (or you can use sugar, but they won't be as moist!)
1 stick of unsalted butter or ¾ cup coconut oil (I used coconut oil, it makes them richer) melted
3 large eggs
1 cup greek yogurt, plain (or use sour cream)
1/2 cup hard cheese, grated like Romano, Parmesan, Cotija (I prefer Romano or Cotija)
Sesame seeds to sprinkle on tops
Preheat oven to 350 degrees F. Lightly grease or line 2 muffin tins (I grease with coconut oil) and set aside
Whisk flour, flax meal, baking powder, and salt together. in a mixing bowl, In a separate bowl cream the honey and butter or coconut oil together. Add eggs one at a time beating until incorporated. Add the yogurt or sour cream and cheese then add the dry to the wet ingredients. Mix/whisk until well incorporated, no need to whip.
Fill muffin tins almost ½ to ¾ full, sprinkle sesame seeds on top and bake for 15 to 20 minutes until golden. Let cool in pan for 5 to 10 minutes then either serve warm or finish cooling on wire racks.
ENJOY! Be sure to let me know what you think of them if you try them!
Thursday, November 15, 2012
Holiday Food Quandaries and Food Intolerances
For the either scenario, please talk with your host about either your food allergies/intolerances, or ask them about theirs if it's the latter. Be sure to ask all the right questions, and be specific. And quit stressing over it!
Most hosts are more than happy for you to bring food or goodies, or come help them prepare food, it can be fun. If you don't have any food intolerances or allergies, it's a great way to expand your culinary skills and learn about new foods that really do taste good!
You just might be amazed......

If you're taking goodies to someone's home, a few ideas to make the cooking simpler. You can make many things without milk, eggs, gluten, soy, etc.
For no dairy, you can use the nut cheeses now available if they can have nuts, and make scalloped potatoes without the cream in them, use coconut cream. Anything that calls for buttermilk or cream can be subbed with coconut milk, if it needs more thickening, use some starch to help thicken as you cook. You can use a vegan margarine, which is usually palm oil based in lieu of butter, or use coconut oil. You can buy a loaf of gluten free bread and make a bread pudding with it or stuffing.
Of course there are many vegetable dishes to be had too! You can make Green Rice to take. It's very good, I assure you. You can make a creamy cabbage dish, a variation on green bean casserole, basic roasted root vegetables or roasted brussel sprouts, a quinoa dish or salad, and by the way good green salads are almost always safe. I'll give you some recipes for ideas, nothing needs to be complicated or stressful.
And if you are the person with the food issues, offer to bring your own sweets or desserts, sides, etc. Perhaps you and the host can work out a main dish that you can partake of too. And if you, the host, want to make sure folks know your food is free of certain ingredients, one way to help is to have these serving utensils from The Food Allergy Kitchenware Co. They're very nice utensils and a good way to mark what foods are safe.
Ok, now you want to know about recipe ideas.... I will share some.
This is a main course meat idea for ham, which is heavenly actually, and I imagine you could do the same for Turkey or Chicken, although I would probably recommend leaving out the maple syrup for the poultry.
Maple Ham in the Crock Pot
1, 7 to 8 lb spiral cut ham
½ cup dark brown sugar
½ cup pure maple syrup
2 cup cherry cider
In a 6 to 7 quart crock pot, place ham flat side down. Rub
brown sugar over all the sides. Pour syrup and cider over. Cook on low setting for
6 to 8 hours, basting during the last hour. Remove ham from crock pot and let
it rest on the cutting board for 15 to 20 minutes before cutting.
Some side dish ideas.....
Bread Stuffing
1 medium sized loaf of gluten-free bread, cubed
Sweet onion, diced
Celery, chopped
2 to 3 Tbl butter or olive oil
1 Tbl of seasonings of your choice
Enough water or broth to moisten well, not soggy
Cube bread, toss with seasonings and spread on a cookie
sheet. Toast cubes lightly in a 275 degrees F oven.
Sauté onion and celery in butter until clear. Add cubes
coating well with mixture. Add broth or water, just enough to moisten the
cubes. If you will be stuffing your bird with it, use less liquid, otherwise
place in buttered baking dish and bake at 350 degrees F until done (about 30
minutes).
Note: you can use cornbread or any of your favorite breads
you have made. You can also add spices as you like or other additions like
giblets or oysters. Cranberries are good also.
Decadently Creamy Leek and Potato Casserole
2½ to 3 lbs potatoes, sliced thin
¼ cup butter
2 leeks, halved and sliced
⅛ cup starch
1 cup cream or plain canned coconut cream (just the thick
part of the milk)
2 cups milk or plain coconut milk (I use So Delicious)
Sea salt and pepper to taste
1 to 2 tsp red chili powder or chipotle powder
2 Tbl dried parsley flakes
10 oz. of shredded white cheeses, mixture of fontina or
swiss, jack, white cheddar, etc. (or use the non dairy cheeses, the cheddar is good)
Scrub and slice potatoes, boil them in water for 8 minutes
and then drain and rinse well with cold water.
Preheat the oven to 350 degrees F. Grease a 9x13x2”
casserole dish and set aside.
Warm the milk and cream together in the microwave for about
2 minutes.
Melt the butter in large sauce pan over medium heat. Add
leeks and cook till tender and soft, stirring occasionally, about 8 minutes.
Add the starch and stir in well to make it pasty. Add chili powder and salt and
pepper and slowly add in milk and cream mixture. Raise the heat to medium-high
and bring to a gentle boil. Cook for about 2 minutes until mixture thickens
some. Remove pot from heat, let stand for a couple of minutes and then whisk in
7 to 8 oz. of the cheeses and parsley.
In the prepared casserole dish, place a layer of half of the
potato slices in the bottom. Spoon in half of the cheese mixture. Place a
second layer of the remaining potatoes and the cheese mixture on top. Sprinkle
remaining cheese on top. Cover with foil and place on a baking sheet (to catch
any drips). Bake covered for 40 to 45 minutes. Remove from oven, uncover and
allow it to rest for 5 to 10 minutes before serving.
Green Rice and Toasted Pepitas
1/3 cup raw, unsalted pepitas (or known as hulled pumpkin
seeds)
½ Tbl olive oil
¼ cup dried chopped cilantro
¼ cup dried chopped parsley
1 small sweet onion, minced
2 cloves of garlic finely minced
1 jalapeno pepper, seeded and minced
Sea salt and pepper to taste
¼ tsp ground cumin
1 cup uncooked brown rice
2½ cups water or low sodium vegetable broth or combination
of.
3 Tbl olive oil
In a 8 inch skillet, heat ½ Tbl olive oil over medium heat
and toast pepitas for about 3 minutes stirring occasionally, until the seeds
are toasted lightly. Remove from the pan onto a dish lined with paper towels.
Set aside.
In a 3 quart saucepan, heat the 3 Tbl of olive oil over
medium heat. When oil is hot, add the rice and garlic and cook 3 to 4 minutes
stirring frequently, until the rice is a bit translucent around the ends. Add
remaining ingredients except toasted pepitas. Increase heat to medium high and
bring to a boil. When boiling, reduce heat to medium-low to simmer for 50
minutes or as directed on the rice packaging. When rice has absorbed almost all
the liquid, remove from heat and stir in toasted pepitas. Cover and let stand
for 10 minutes before serving.
Black Bean Salad
1, 14oz. can black beans, rinsed well and drained
1oz. fresh cilantro, chopped
1oz. fresh parsley, chopped
¼ cup sweet onion, minced
½ cup red bell pepper, finely chopped
1 medium tomato, diced
1 cup olive oil
4 key limes, juiced
½ tsp cumin
¼ tsp cayenne pepper
Sea salt and pepper to taste
¼ can chipotle en adobo peppers, pureed
¼ oz. chili powder
Combine all ingredients together, place in non-reactive
covered container and refrigerate overnight before serving.
Desserts???? Try these.

Fruit Cobbler
2 to 2½ cups of fruit (frozen or fresh)
Batter:
½ cup sugar
1 cup (140g) flour
½ tsp gum
2 tsp baking powder
⅛ tsp salt
1 to 1½ cup milk, milk substitute or water (enough to make
the batter pourable)
Topping:
½ to 1 cup sugar (enough to cover the batter)
½ cup boiling water
Put fruit into a greased deep baking dish or casserole dish.
Pour batter over the fruit and sprinkle the sugar over the batter, finally
pouring the boiling water over the sugar covered batter.
Bake at 375 degrees F for about 40 to 55 minutes until the
top is golden and crusty.
Serve warm with a scoop of ice cream or with heavy cream at
room temperature.
Note: if you use a juicy type fruit that is frozen, you may
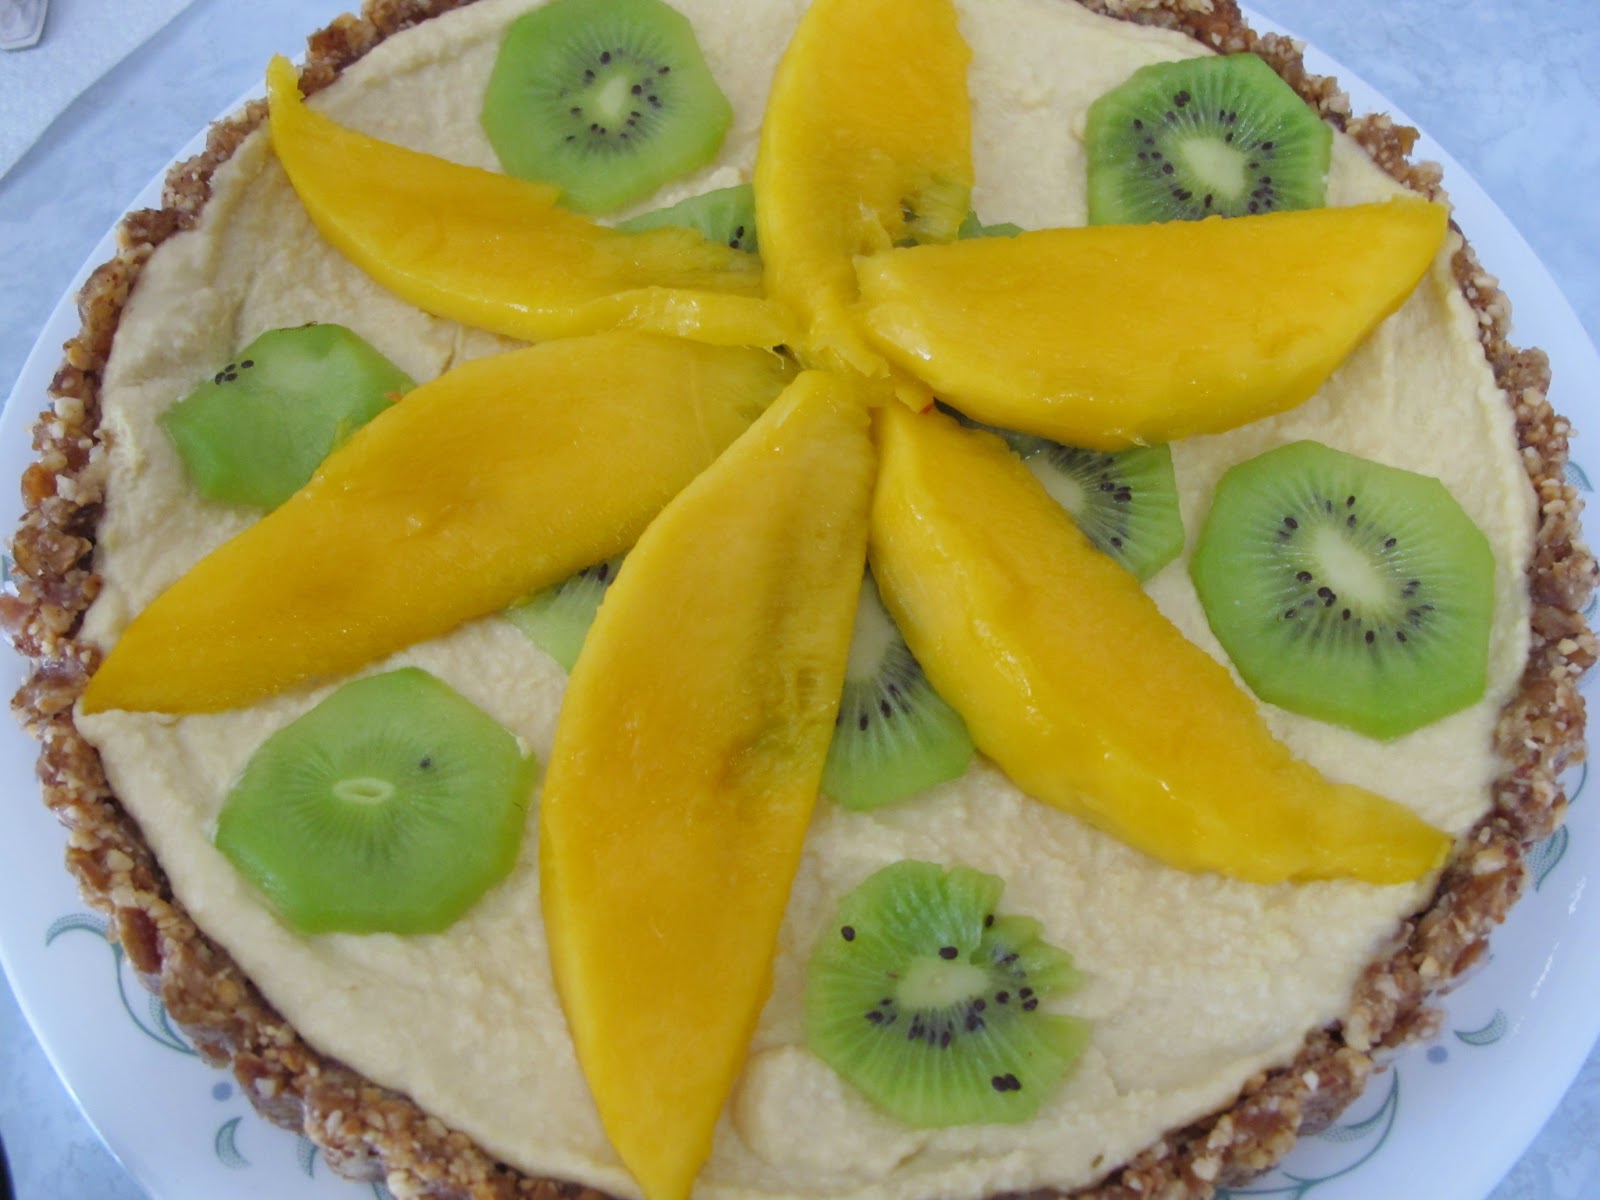
wish to add ¼ to ⅓ cup tapioca granules to help it gel.Coconut Cream Tart with Mangoes and Kiwi
Coconut Cream Tart Filling
1 prepared Date Nut tart crust, or crust of choice
½ cup raw cashews
1 cup unsweetened shredded coconut
4 to 6 Tbl coconut creamer (I use So Delicious)
2 Tbl coconut oil, melted
2 tsp pure vanilla extract
¼ cup agave or honey
¼ cup applesauce, or mashed banana
½ cup pureed fruit, mango, peach, etc.
½ cup pureed fruit, mango, peach, etc.
Soak cashews and coconut in water overnight. Drain water
from cashews and pulse in food processor or high speed blender until smooth and
creamy, adding a tablespoon or so as needed of coconut creamer. Drain any
excess water from coconut shreds and add to cashew mixture, adding creamer as necessary.
Processing all until smooth, thick and creamy.
Add oil, agave or honey, vanilla and pureed fruit. Pulse
till combined.
Pour into prepared crust and refrigerate a minimum of one
hour to allow it to set before topping with sliced fruit or berries. Serve
chilled.
Have fun, and above all, use your creativity to create good, fresh, and whole foods. Stop stressing, focus on what it's really all about, family and friends. Food is secondary. Questions? Ask away.....
Friday, November 2, 2012
Some Basics when baking or converting to gluten free
It occurred to me this evening as I was discussing baking gluten-free with a local chef while out with friends for supper that I probably should write up something on the basics. Many new people going gluten free or learning to bake gluten free are intimidated or frightened by all the lingo or that there seems to be so many more steps.
He mentioned that he has had a hard time figuring out baking gluten free and that you cannot substitute one flour straight across for wheat flour, and he asked about using gums.
Well, these are valid points. It really doesnt work to sub just say, rice flour for wheat flour and expect to have the same results as you would with the wheat flour. This is because the flours don't have the same components as wheat flour that give it the elasticity or starch or proteins. So to compensate, you need to make a blend of at least 3 flours, and depending on what you are making would you need to add a gum or agar or flax, etc. to get your elasticity and cohesion.
I have found that for some cakes if you don't use eggs, you would need some gum for the cohesion and sponge texture. Same for breads, you can forgo gum if you plan to eat or consume it all right away, but by day two it becomes crumbly and loses cohesion.
Usually cookies, scones, some muffins (like my oatmeal muffins) do not require gum at all in them. Pie crusts dont need the gum either, you want them flaky and to melt in your mouth.
On to flour components. Its good to have a base flour, the main one that has your protein components like brown rice, amaranth, quinoa, buckwheat, etc., then you want a starchy sweet type flour like tapioca, sorghum, white rice flour, etc., then you need a stach flour which provides the chew and thickens and makes your baked goods lighter and fluffier, like potato starch, corn starch, or arrowroot. However, when baking cakes, if you are wanting the light airy cake textures, you want to keep it fairly stachy flours, the blends I have had the most success with, that keeps people raving over taste and texture are white rice, tapioca or sorghum and arrowroot or potato flour. I have found that Bob's Red Mill's All Purpose GF Mix is fab for cookies as its base is a blend of bean flours and for some reason seems to make an awesome base for cookies. For my breads I like a mix of protein rich flours, quinoa, almond, amaranth, etc., mixed with tapioca and a starch. those are my preferences, and I think they work well for crusty crusts and soft chewy interiors.
When converting a traditional recipe to gluten free, weight is the key to success. All flours have different weights and how you measure a cup is going to be different everytime. Weighing your flours is the most consistent and will ensure your success. using a base weight of 140 grams equaling 1 cup of traditional flour will ensure you get the right amount of flour for your recipe. Look back at my Lemon Tea Cakes recipe, that was converted straight across.
So assuming 140 grams equals one cup, if your traditional recipe says 1 1/2 cups of flour, you would weigh out 210 grams of your flour mix, and proceed from there.
I would strongly recommend you go buy a digital scale that weighs both in ounces and grams. doesnt have to be expensive. Trust me that it will become the most important tool in your kitchen for baking. You will have consistency in your cakes and cookies everytime.
The other thing I will recommend to you is to get a copy of Michael Ruhlman's book, Ratios. It is invaluable in understanding how to make the basics and you can create many wonderful things from there.
No difference in quantities for baked goods when converting flour wise, as long as you weigh. Breads are different, when converting a bread recipe you will need at least half again as much liquid as what is called for in the original recipe. If the original recipe calls for 1 cup of liquid, you will add at least 1/2 to 1 cup more. You want the bread dough more like a thick shiny pancake batter. the amount of the water or liquid will also depend on your flours you are using.
And when mixing your breads, the last step is to beat the dough on high for 3 minutes to activate the gum acting as the gluten. This also serves to help beat air into your dough and helps it rise better.
When you have things you need to roll out like pie crusts, some cookies, etc., a little flour on the surface can help, but rolling between two sheets of parchment paper or cling wrap (the clear stuff) works best and your rolling pin won't stick to the dough. Some doughs need to be chilled and firm before rolling out, like pie crusts.
Otherwise, the basics are the same for creating any delicious baked treat.
These are my observations and techniques that give me amazing results time after time, and suprise everyone who tastes them. They always get an amazed look of sheer surprise and pleasure, and the question always is, "This is gluten free???" That is success in my book, and I get a lot of pleasure in making and sharing a superb goodie for my friends and loved ones. Which may explain why my nephews always want me to make their birthday cakes.
Have questions? Not sure of yourself? Ask away, and don't be afraid to jump in and try it. If it fails, oh well huh? You learned what not to do, and probably still have something tasty you can remake into something else, like cake crumbs in ice cream, or a trifle, in yogurt.... oh the list is endless. Dive in and enjoy baking again! Its not that scary or complicated!
Subscribe to:
Posts (Atom)